Context
This project documents an ongoing effort to map and understand a real residential house at a systems level. The goal was not visualization, but clarity: making hidden systems visible and usable.
Challenge
To understand how the house actually works, how its systems are arranged in reality, and make it efficient and comfortable to live in.
Approach
• Manual measurements of all floors
• Full-scale 3D model based on real dimensions
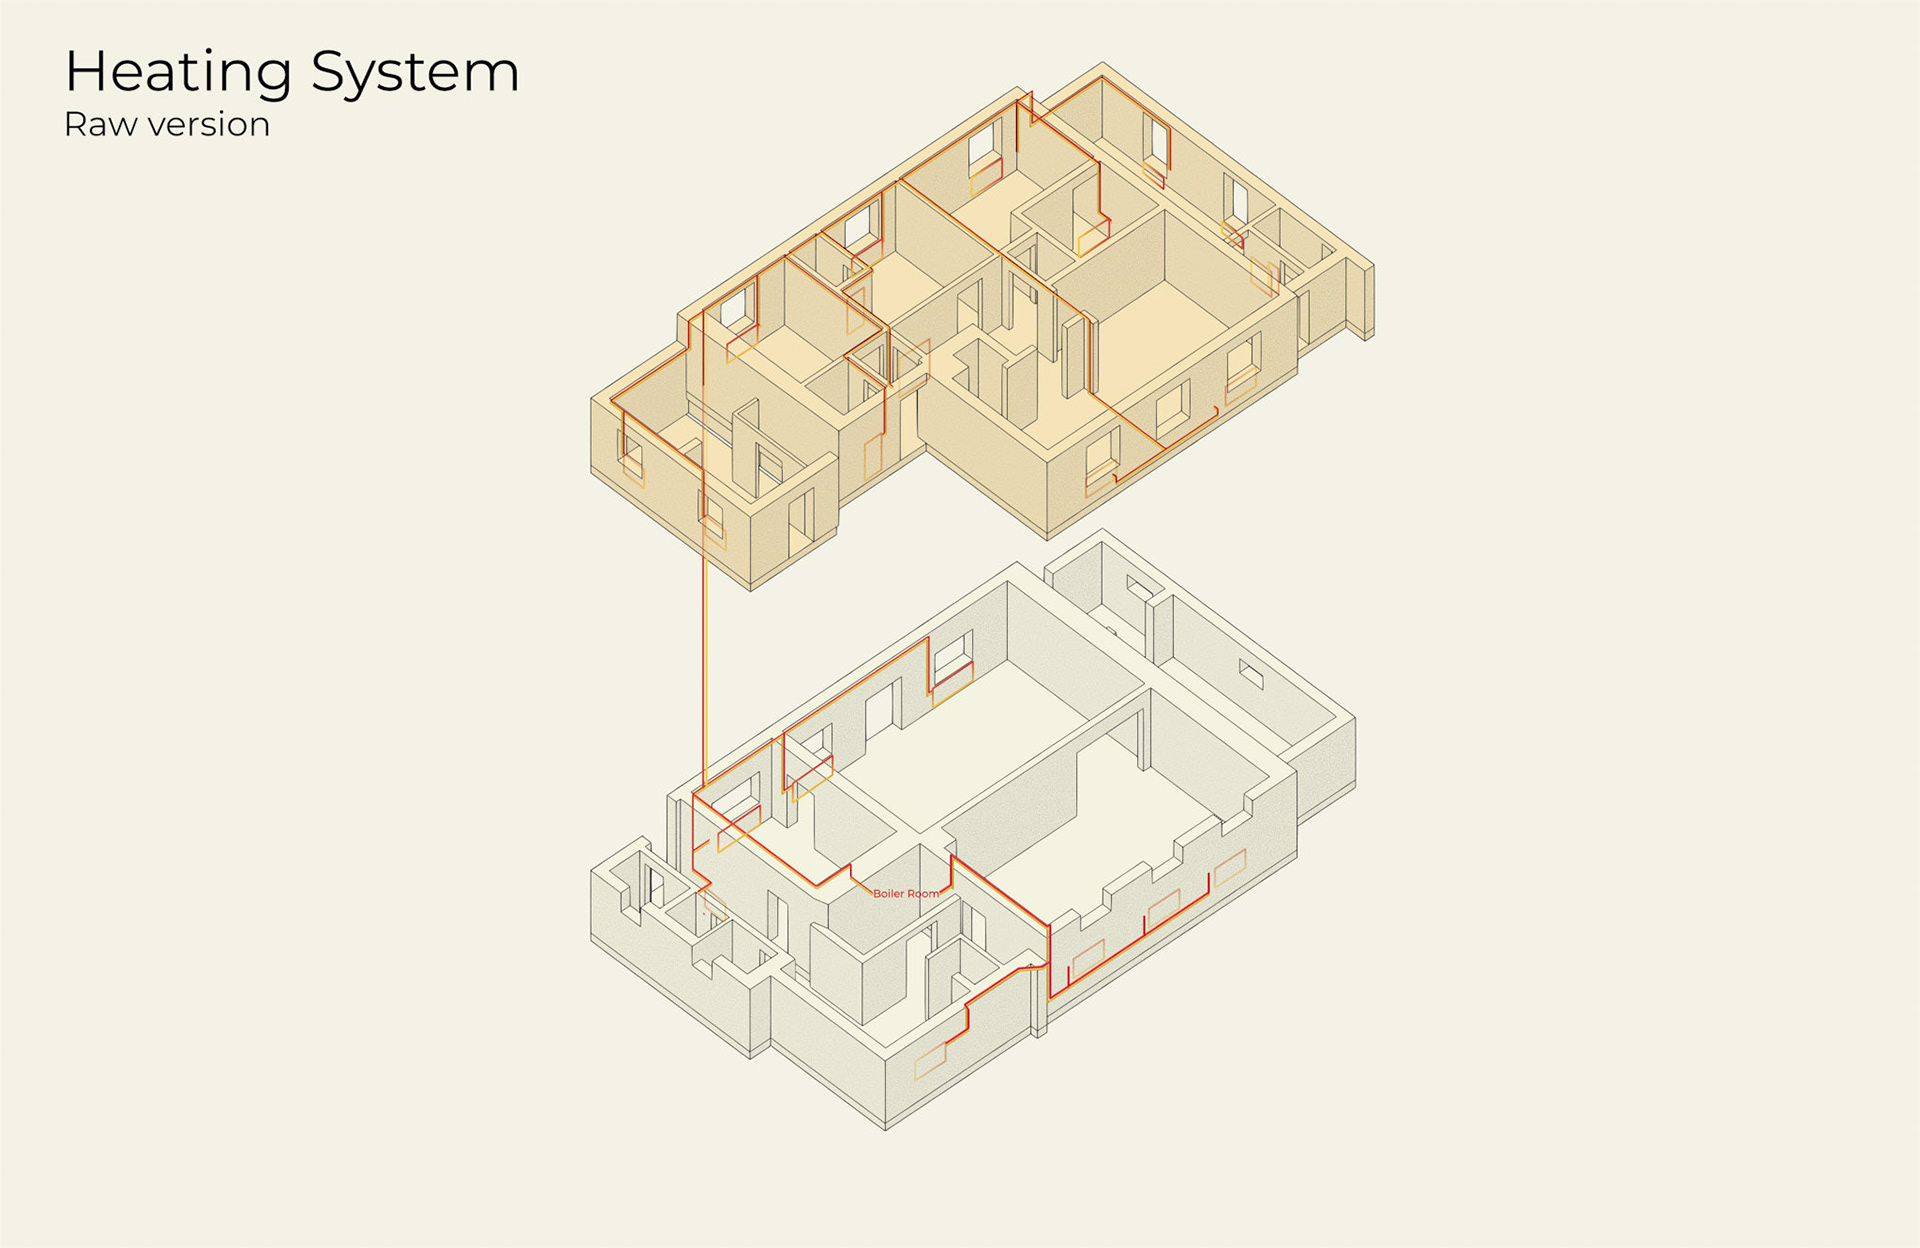
• Logical reconstruction of heating and water pipes
• LiDAR scanning of the property and the secondary building
• Integration with Home Assistant
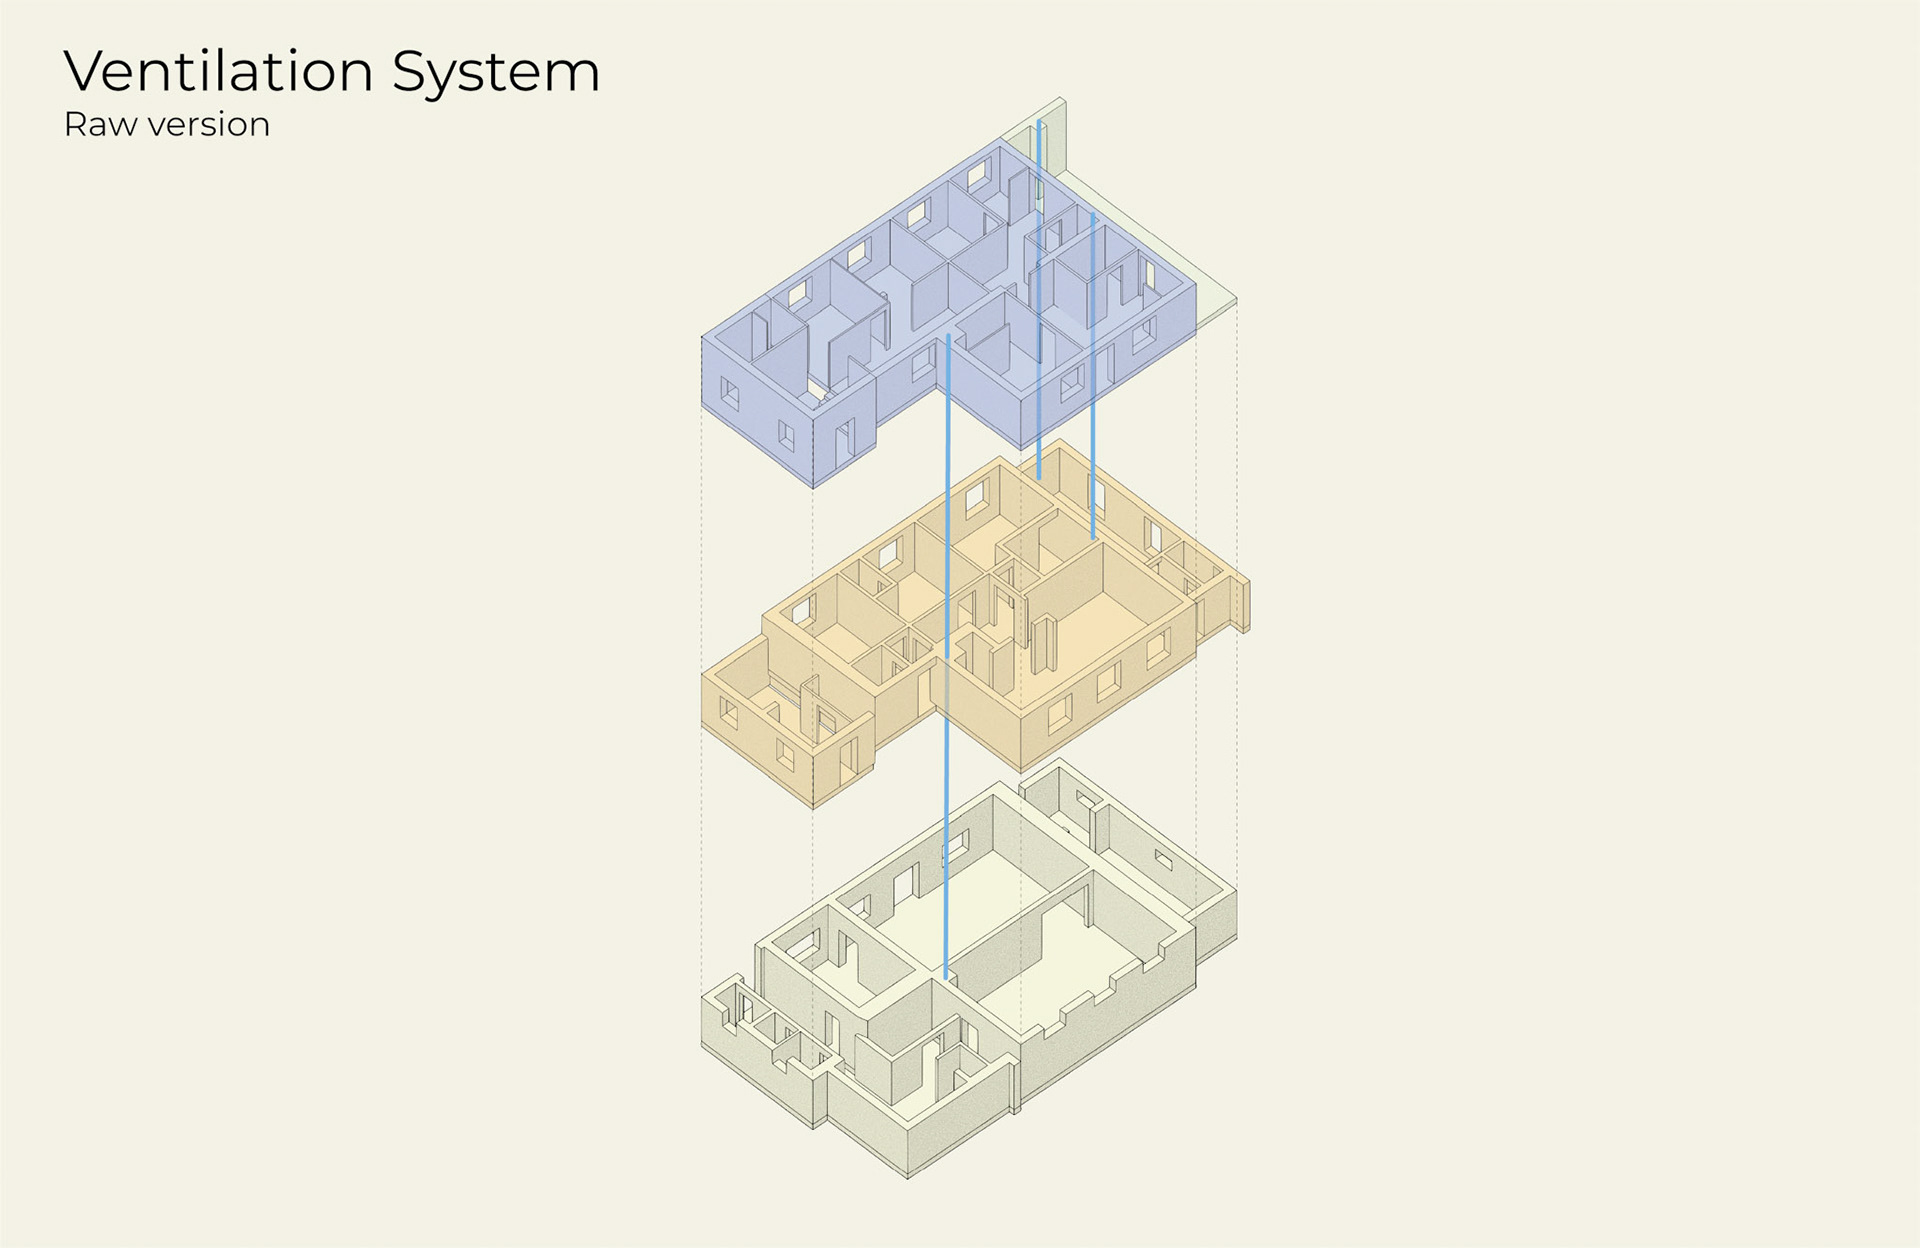
• Thermal imaging to locate hidden water pipes
• Full-scale 3D model based on real dimensions
• Logical reconstruction of heating and water pipes
• LiDAR scanning of the property and the secondary building
• Integration with Home Assistant
• Thermal imaging to locate hidden water pipes
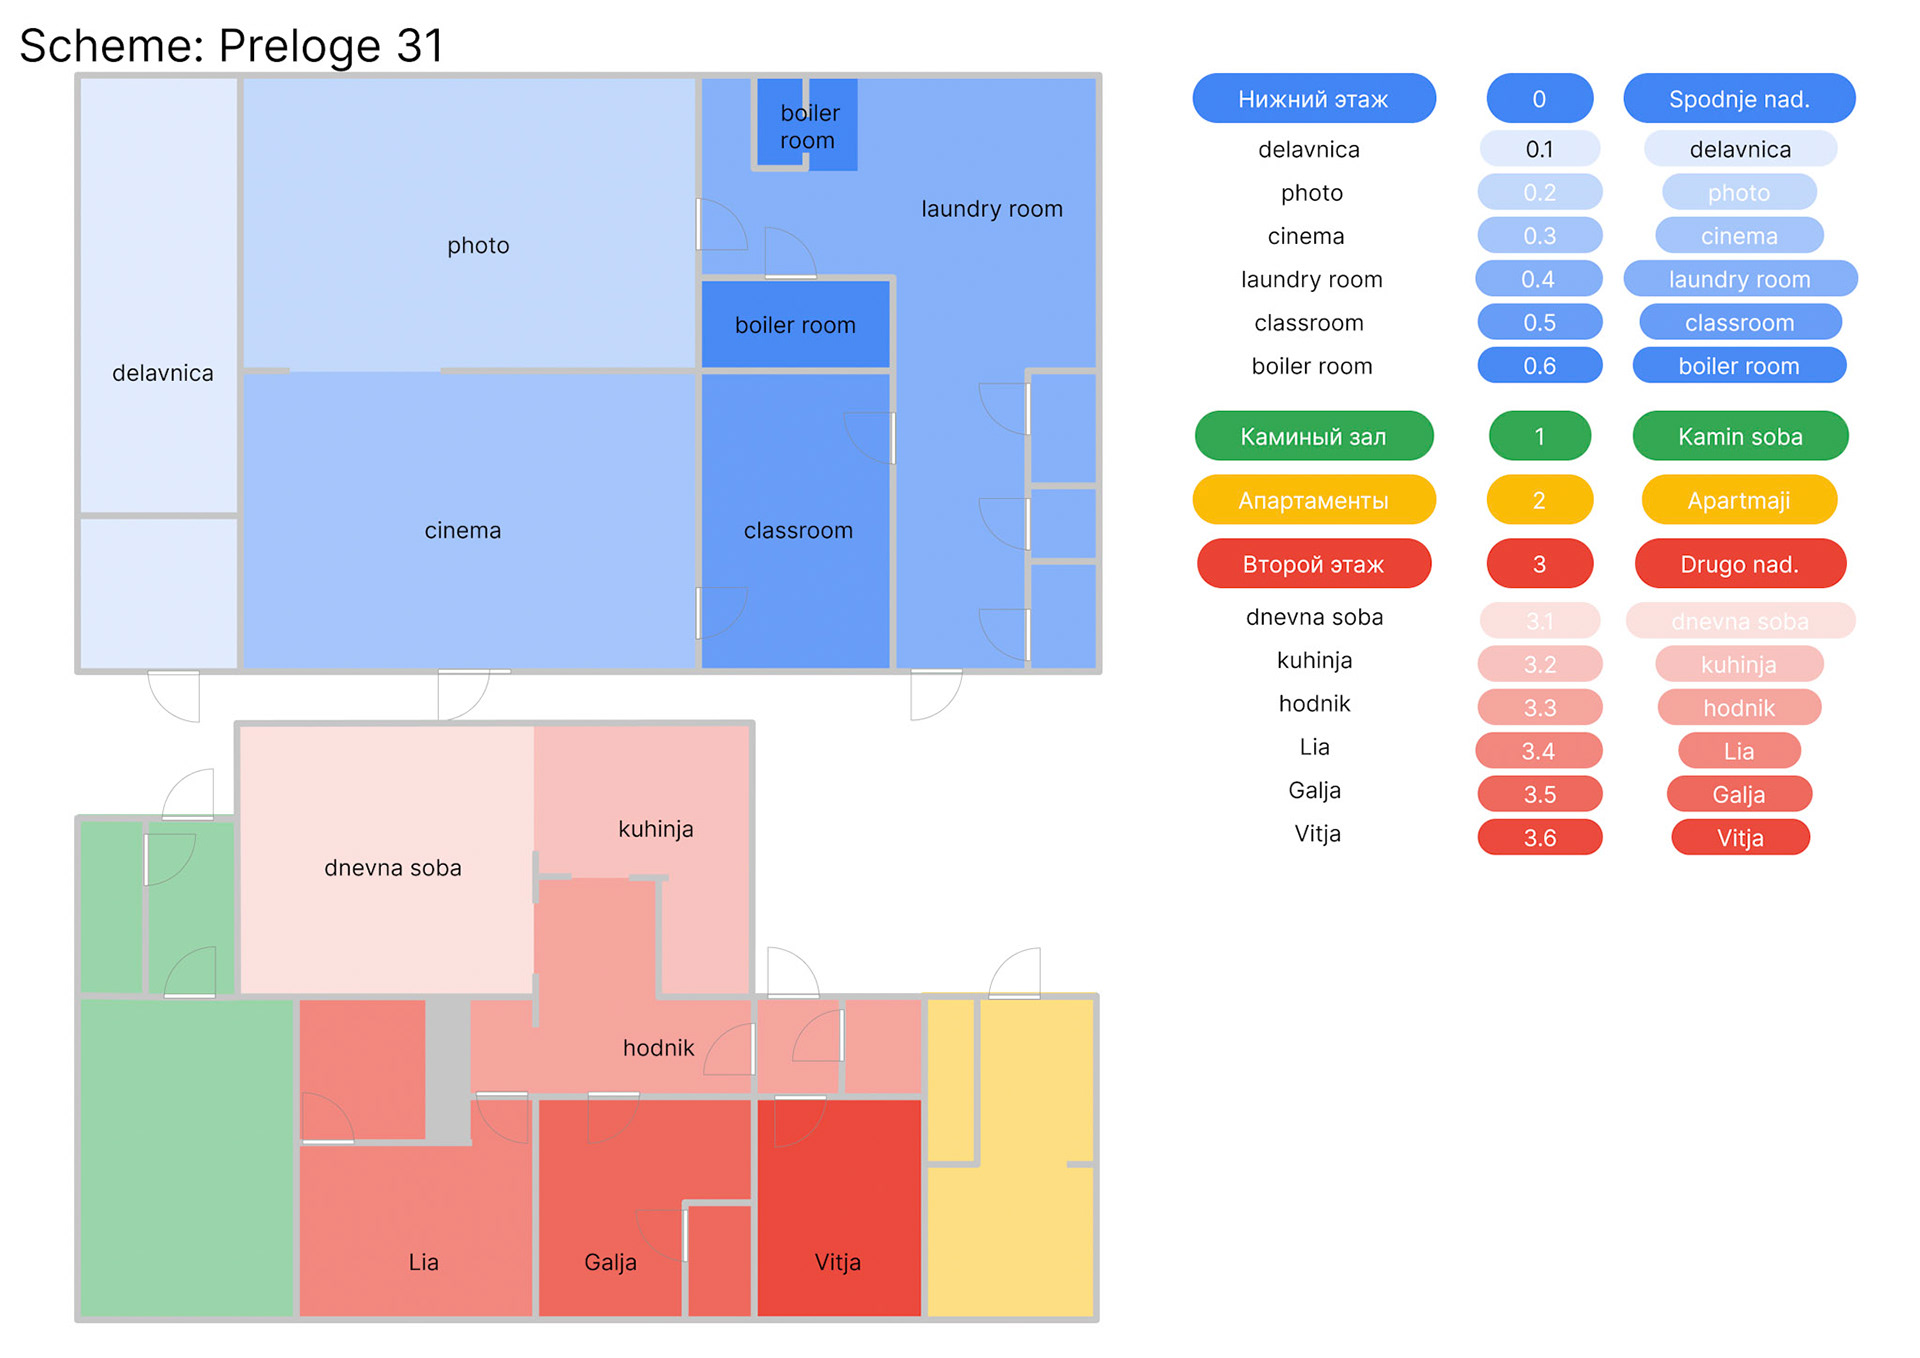
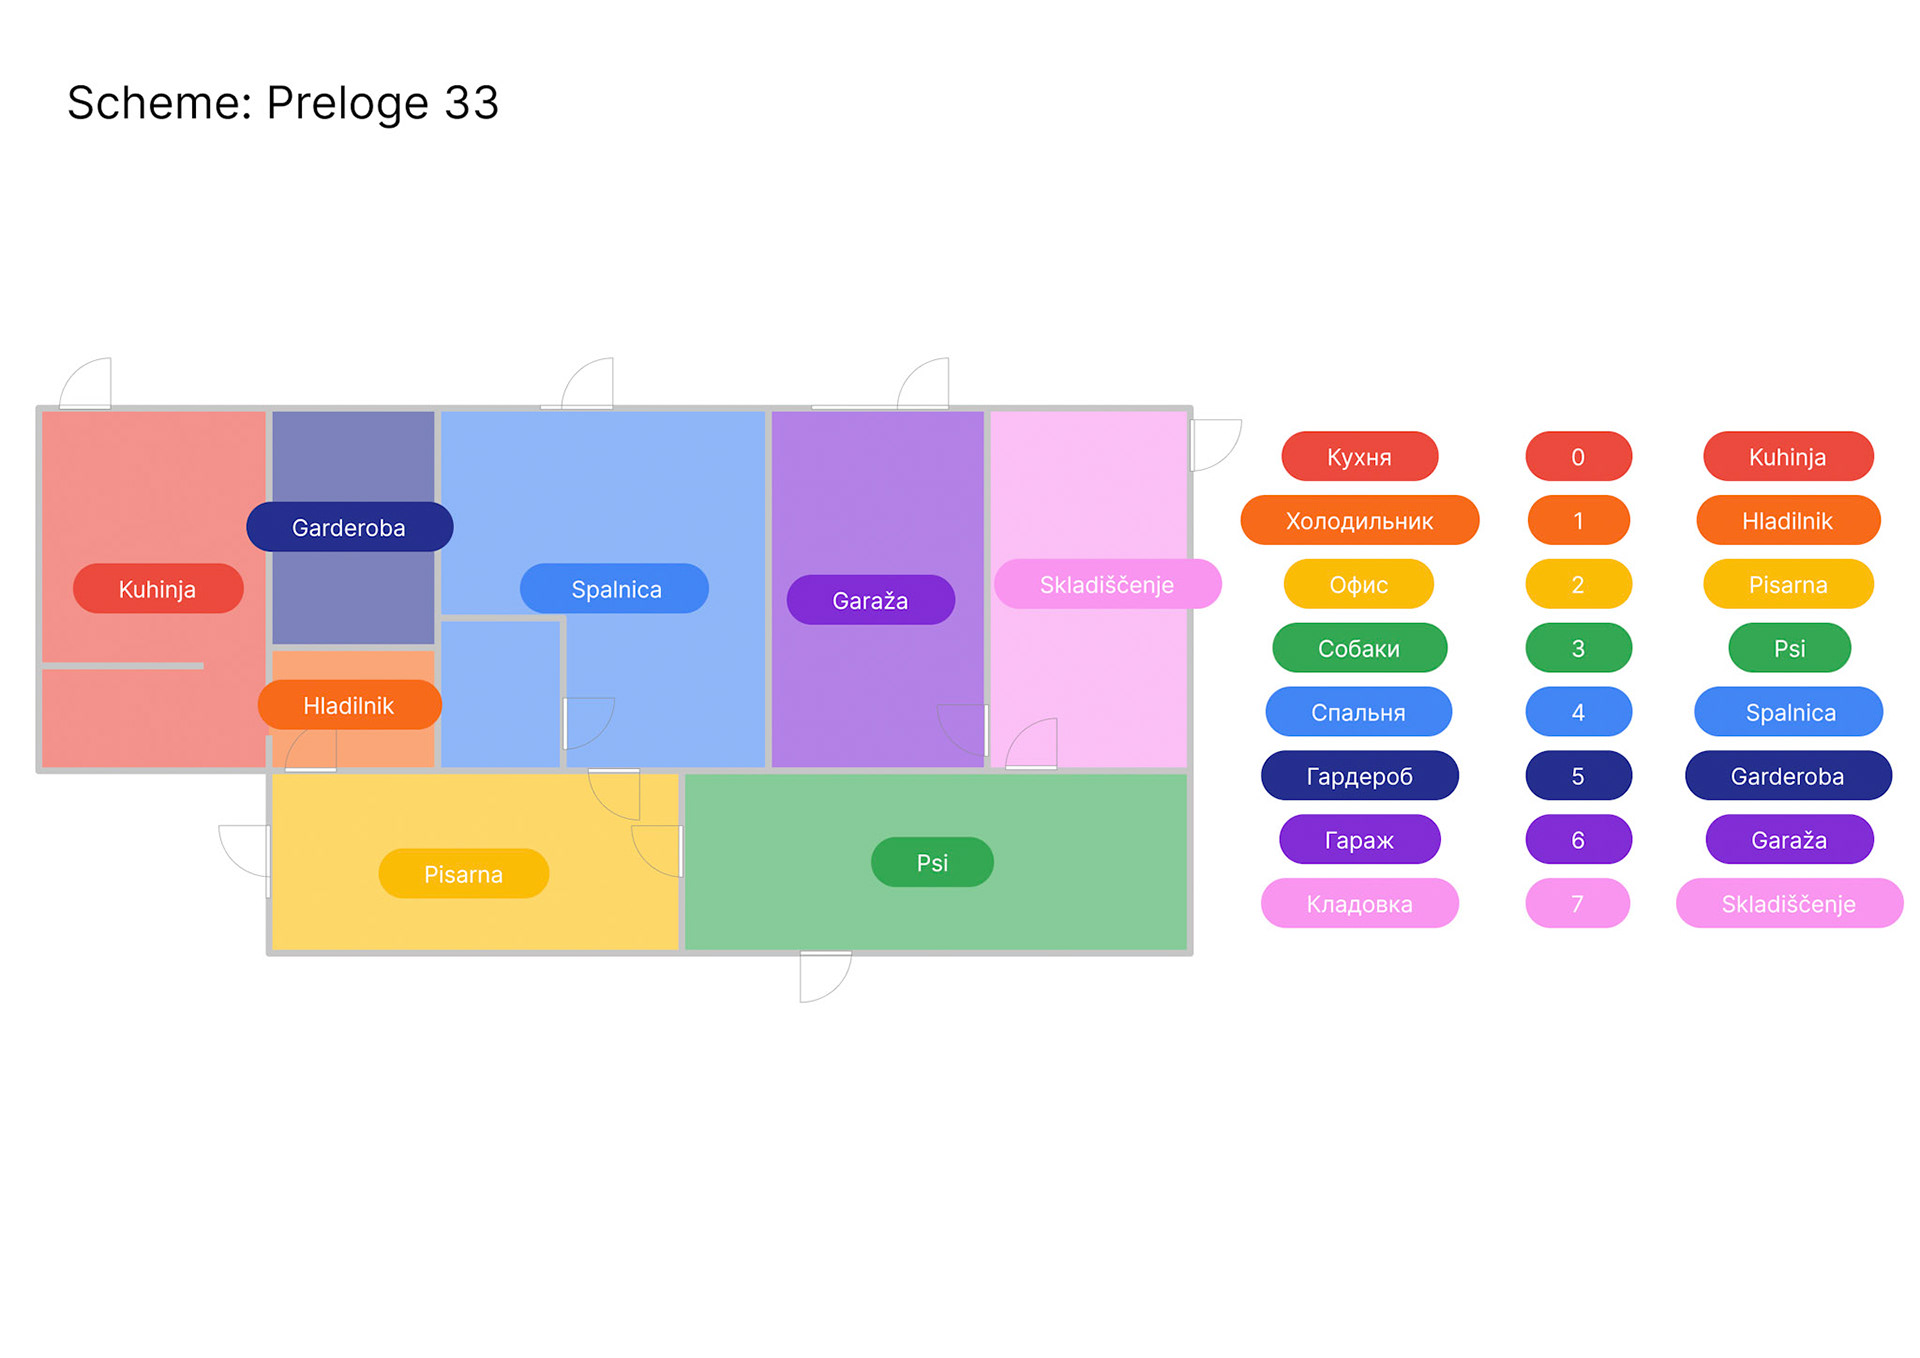
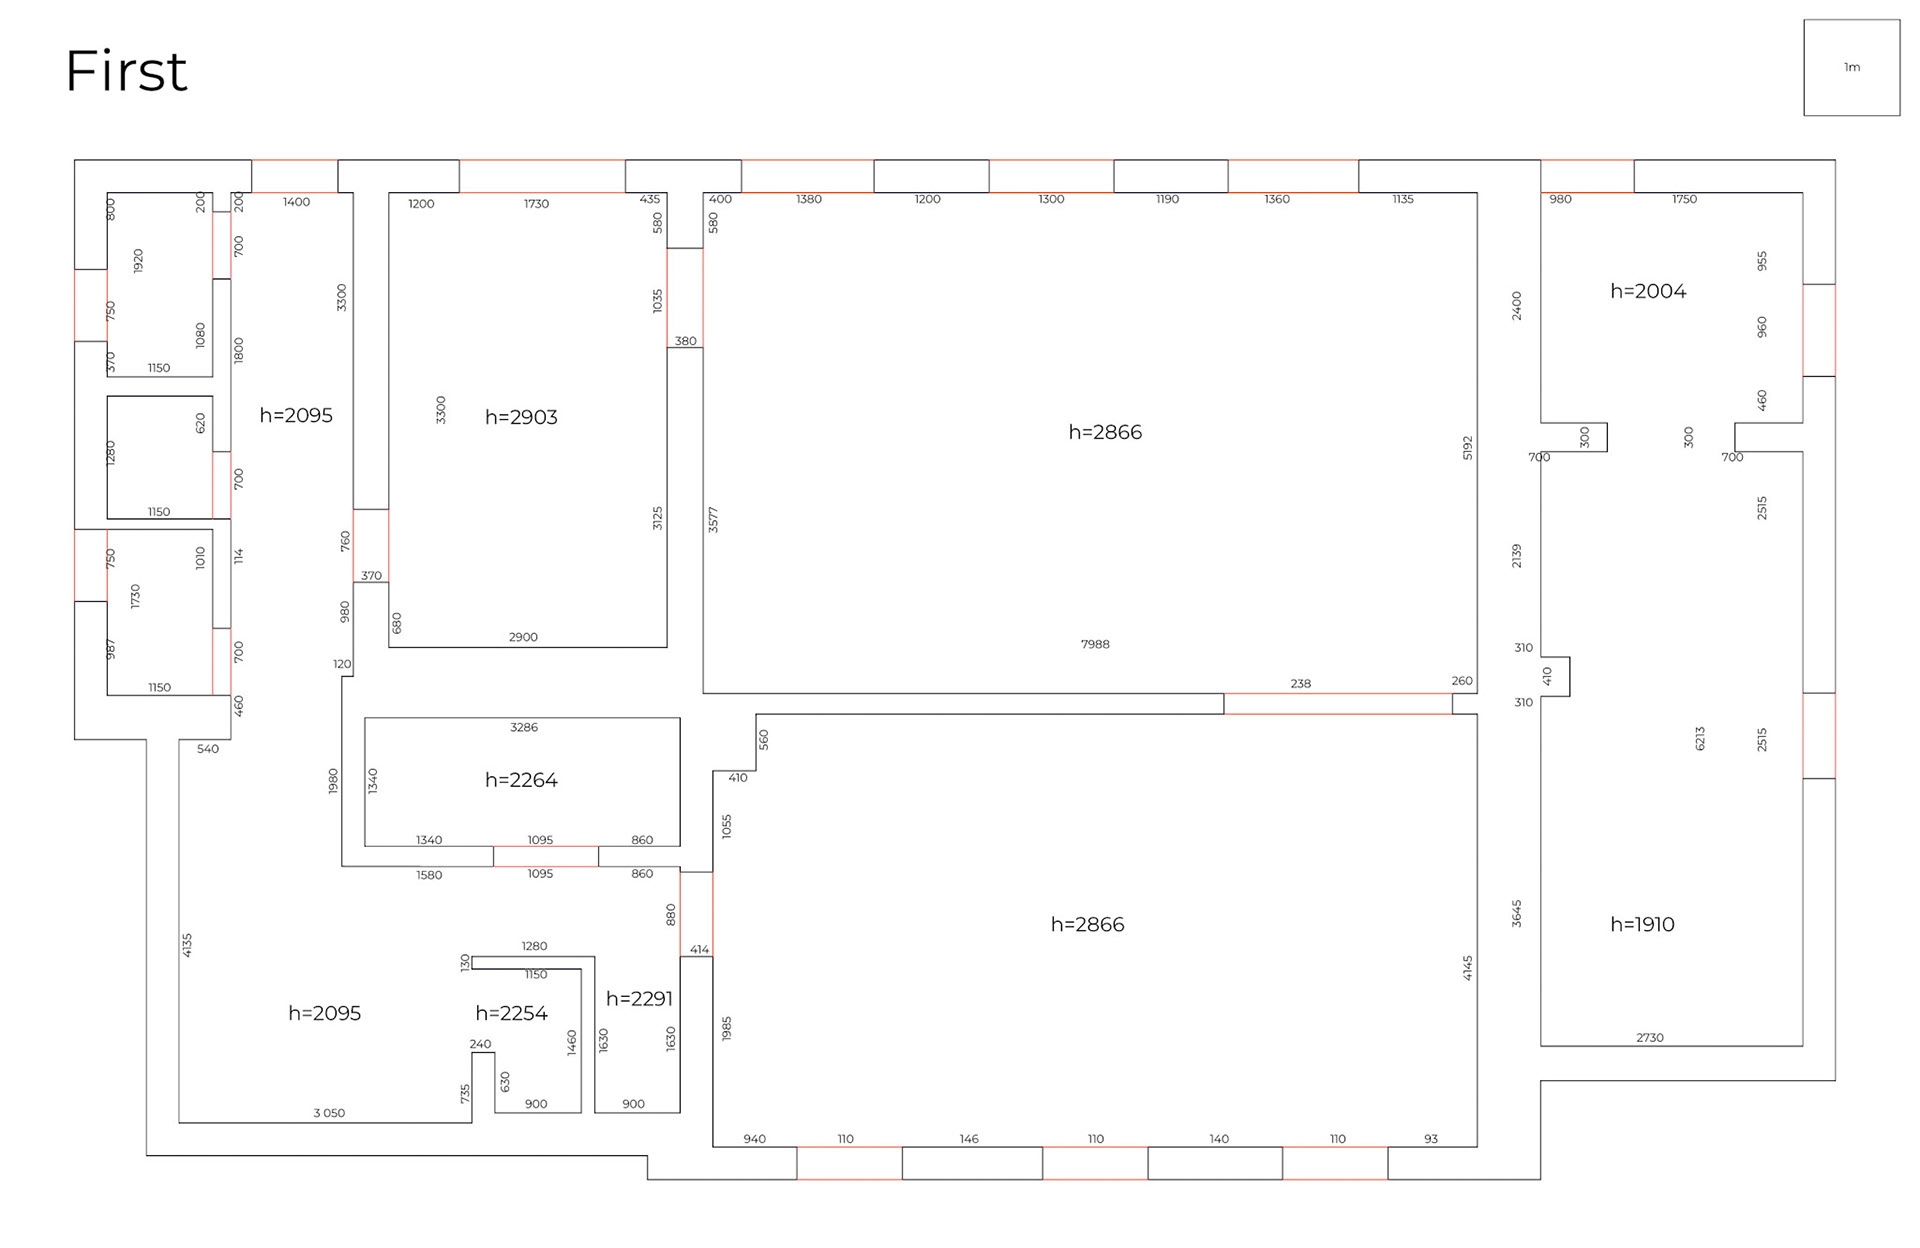
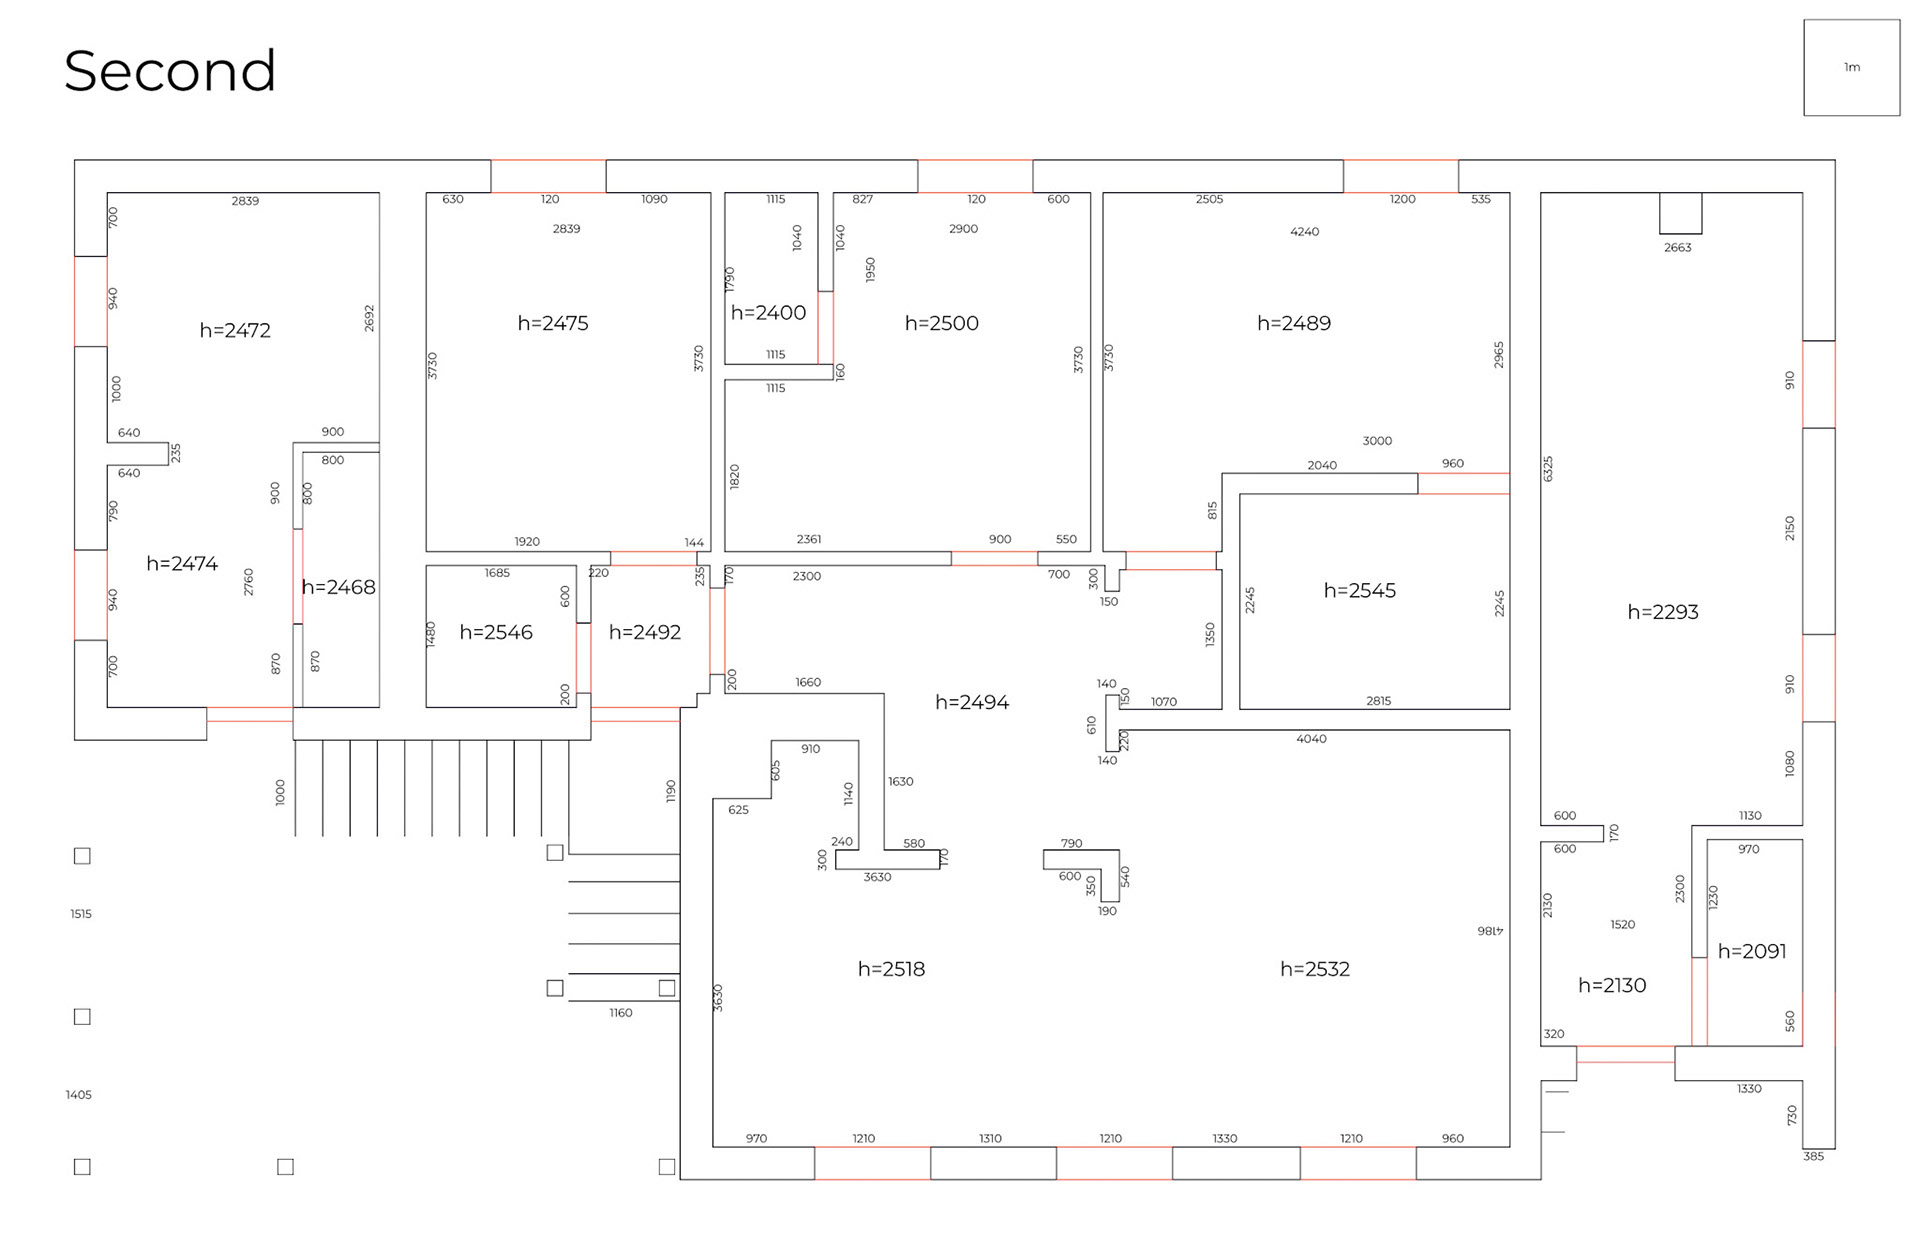
Stage 1 — Initial mapping
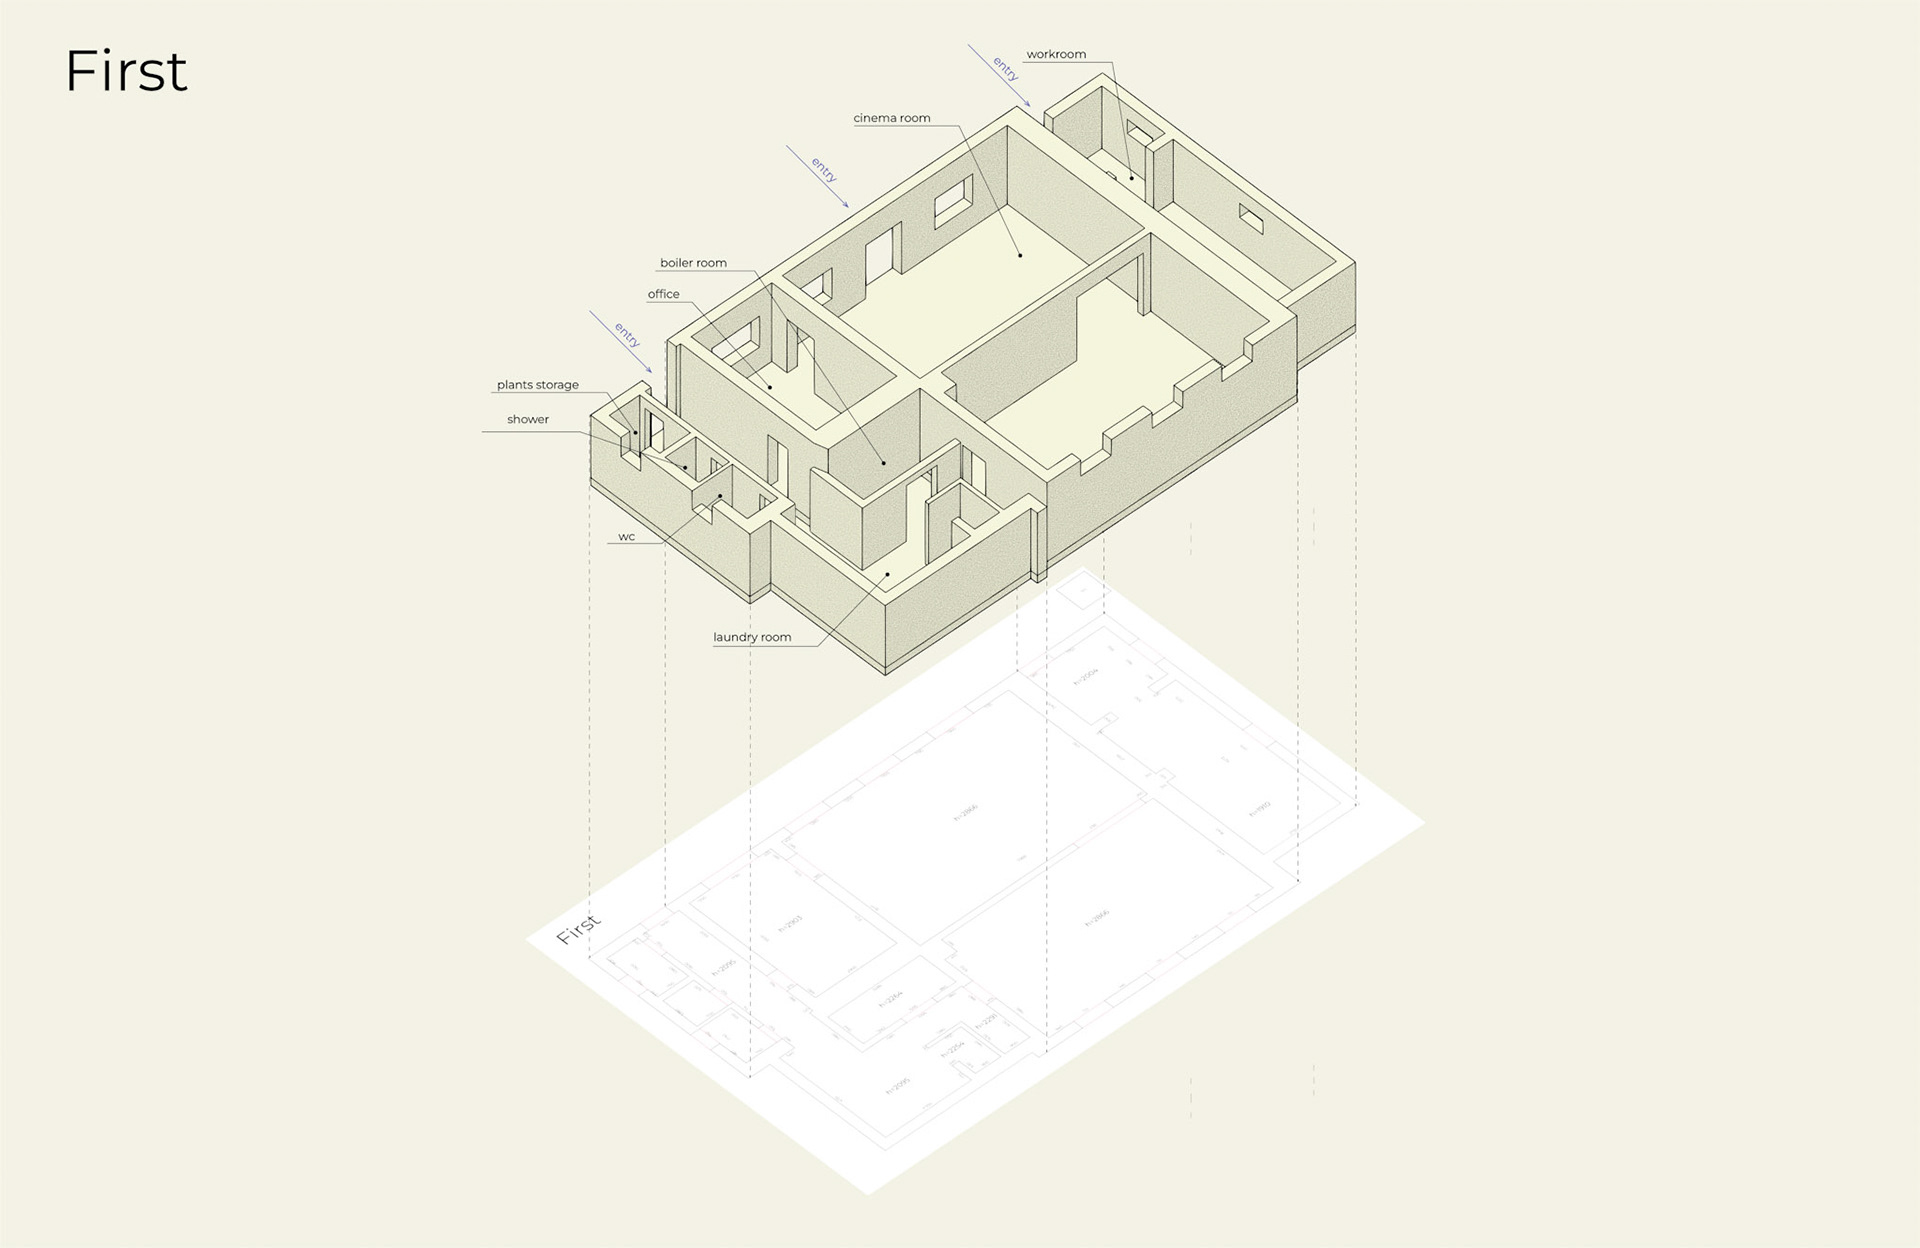
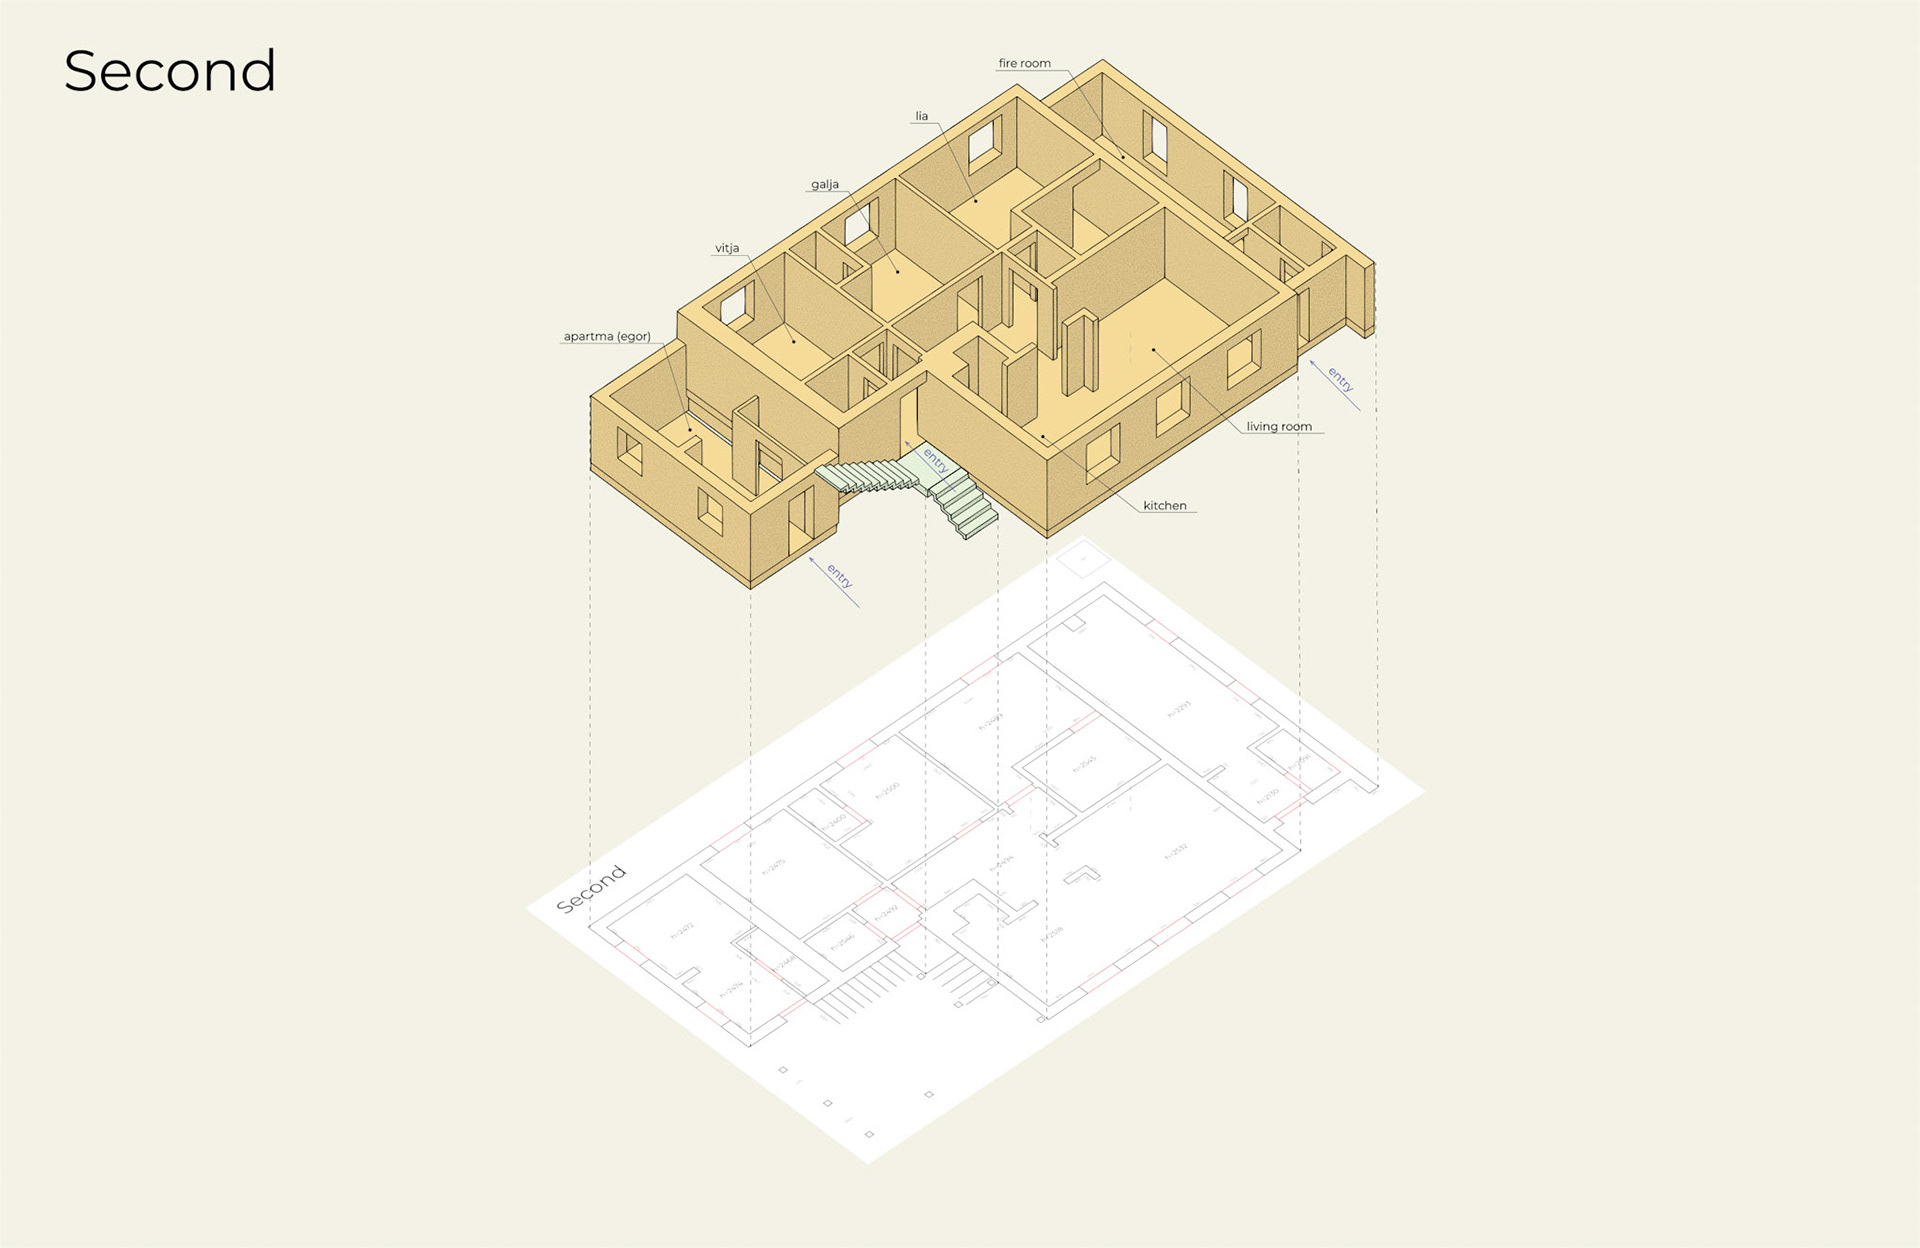
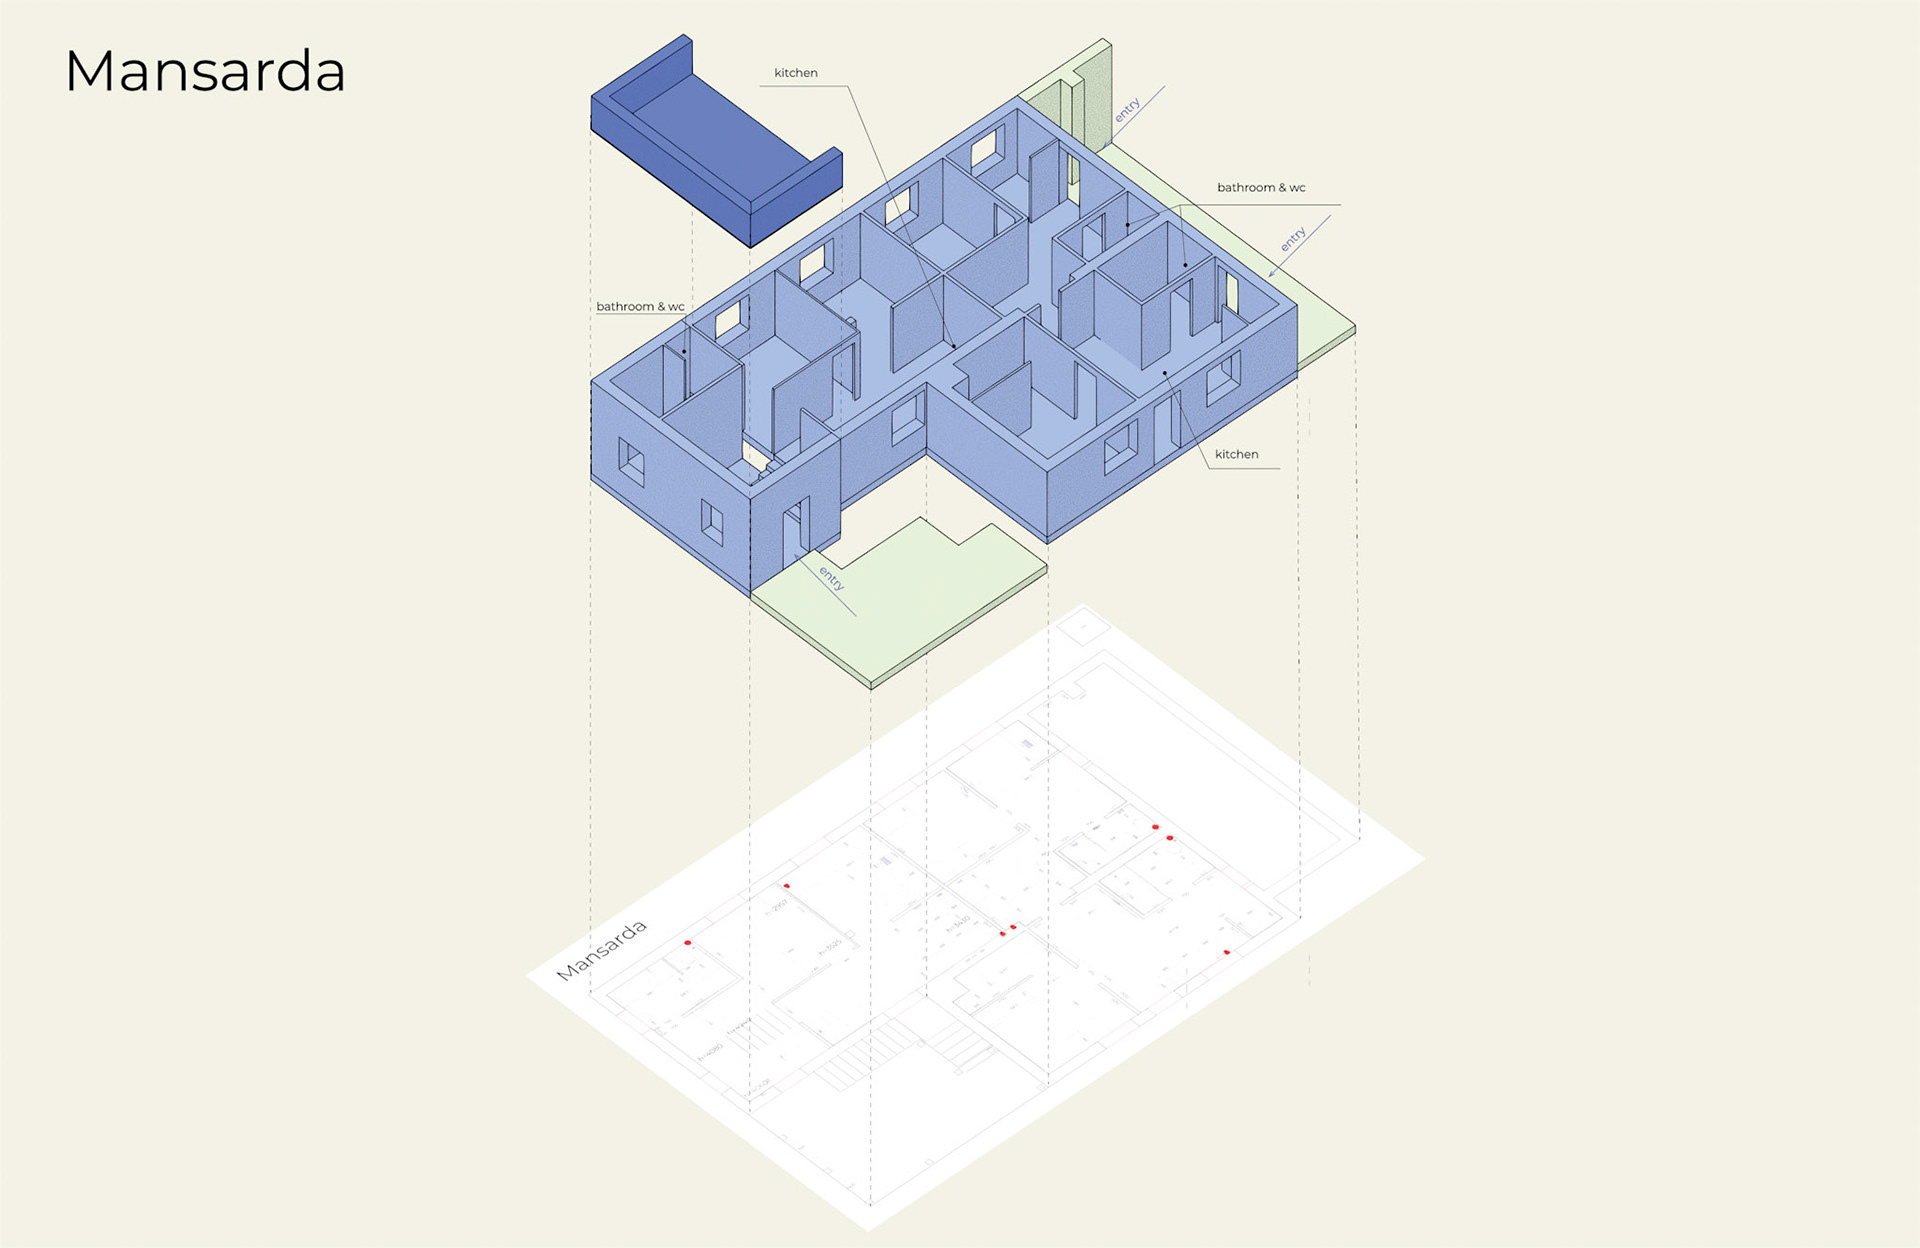
An approximate 2D plan of the house was created to reflect how it is actually laid out.
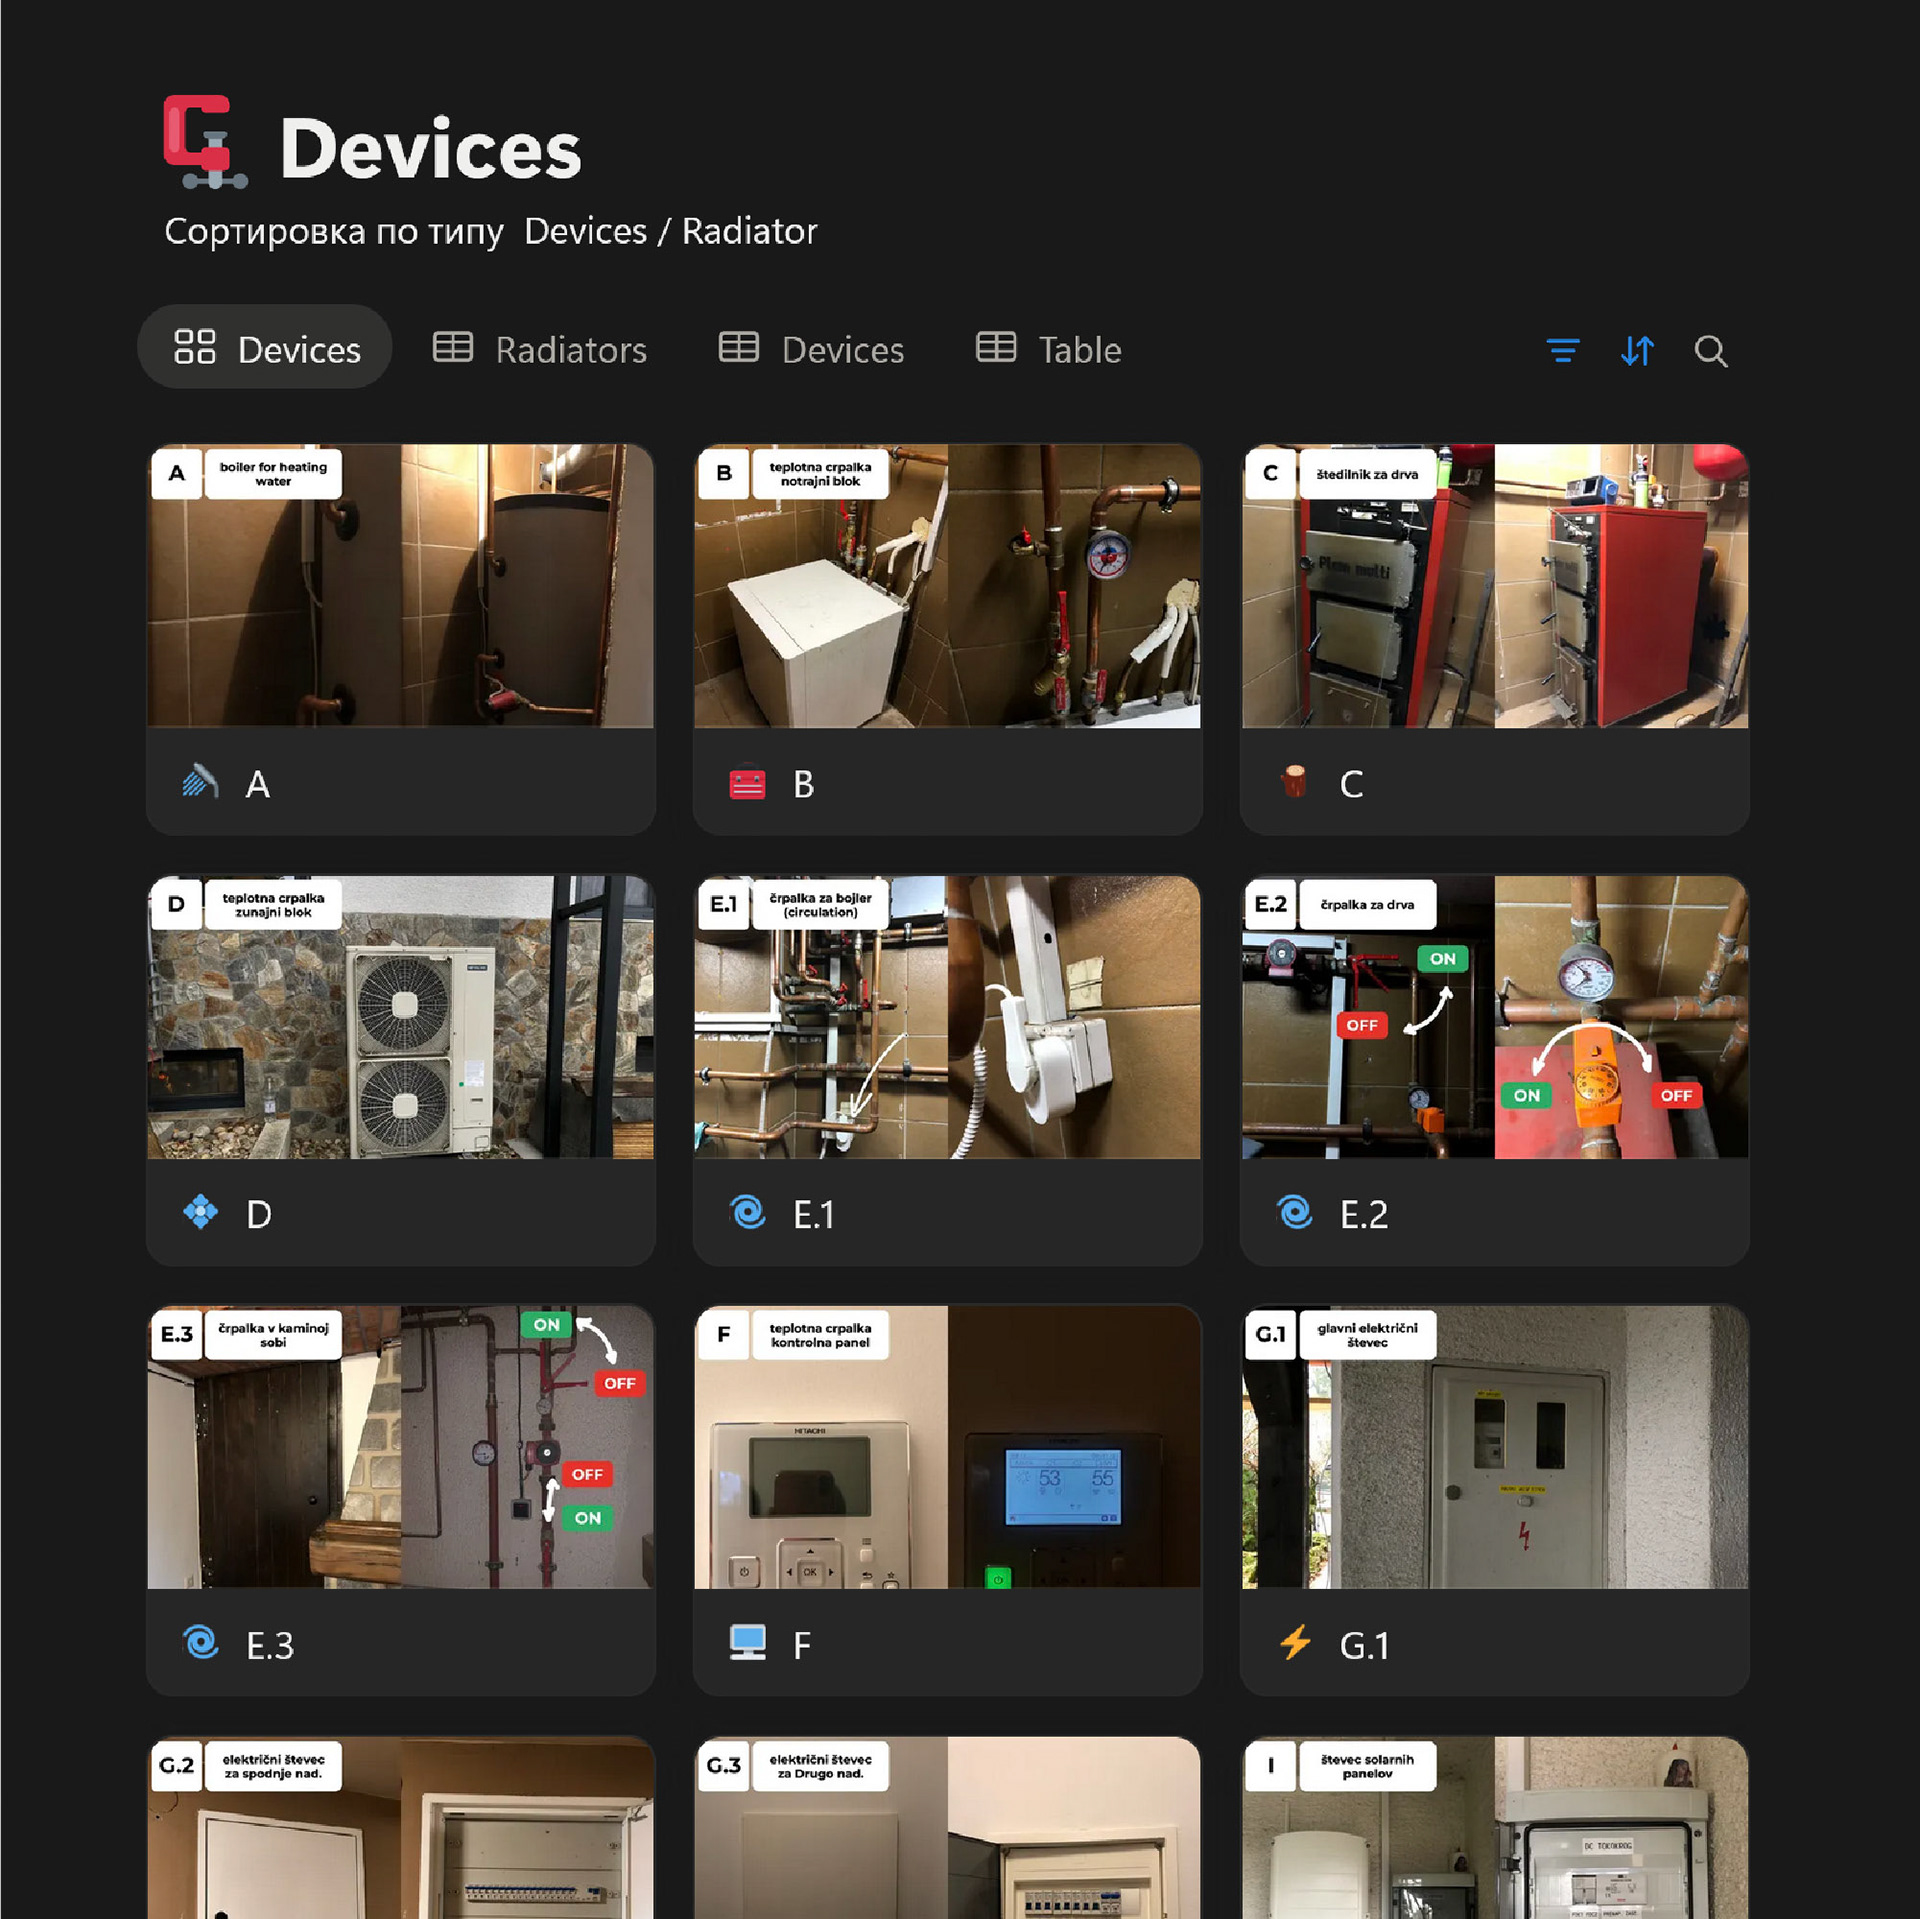
A shared documentation space was set up in Notion, as all instructions previously existed only in people’s heads. Even simple actions required asking others how things worked.
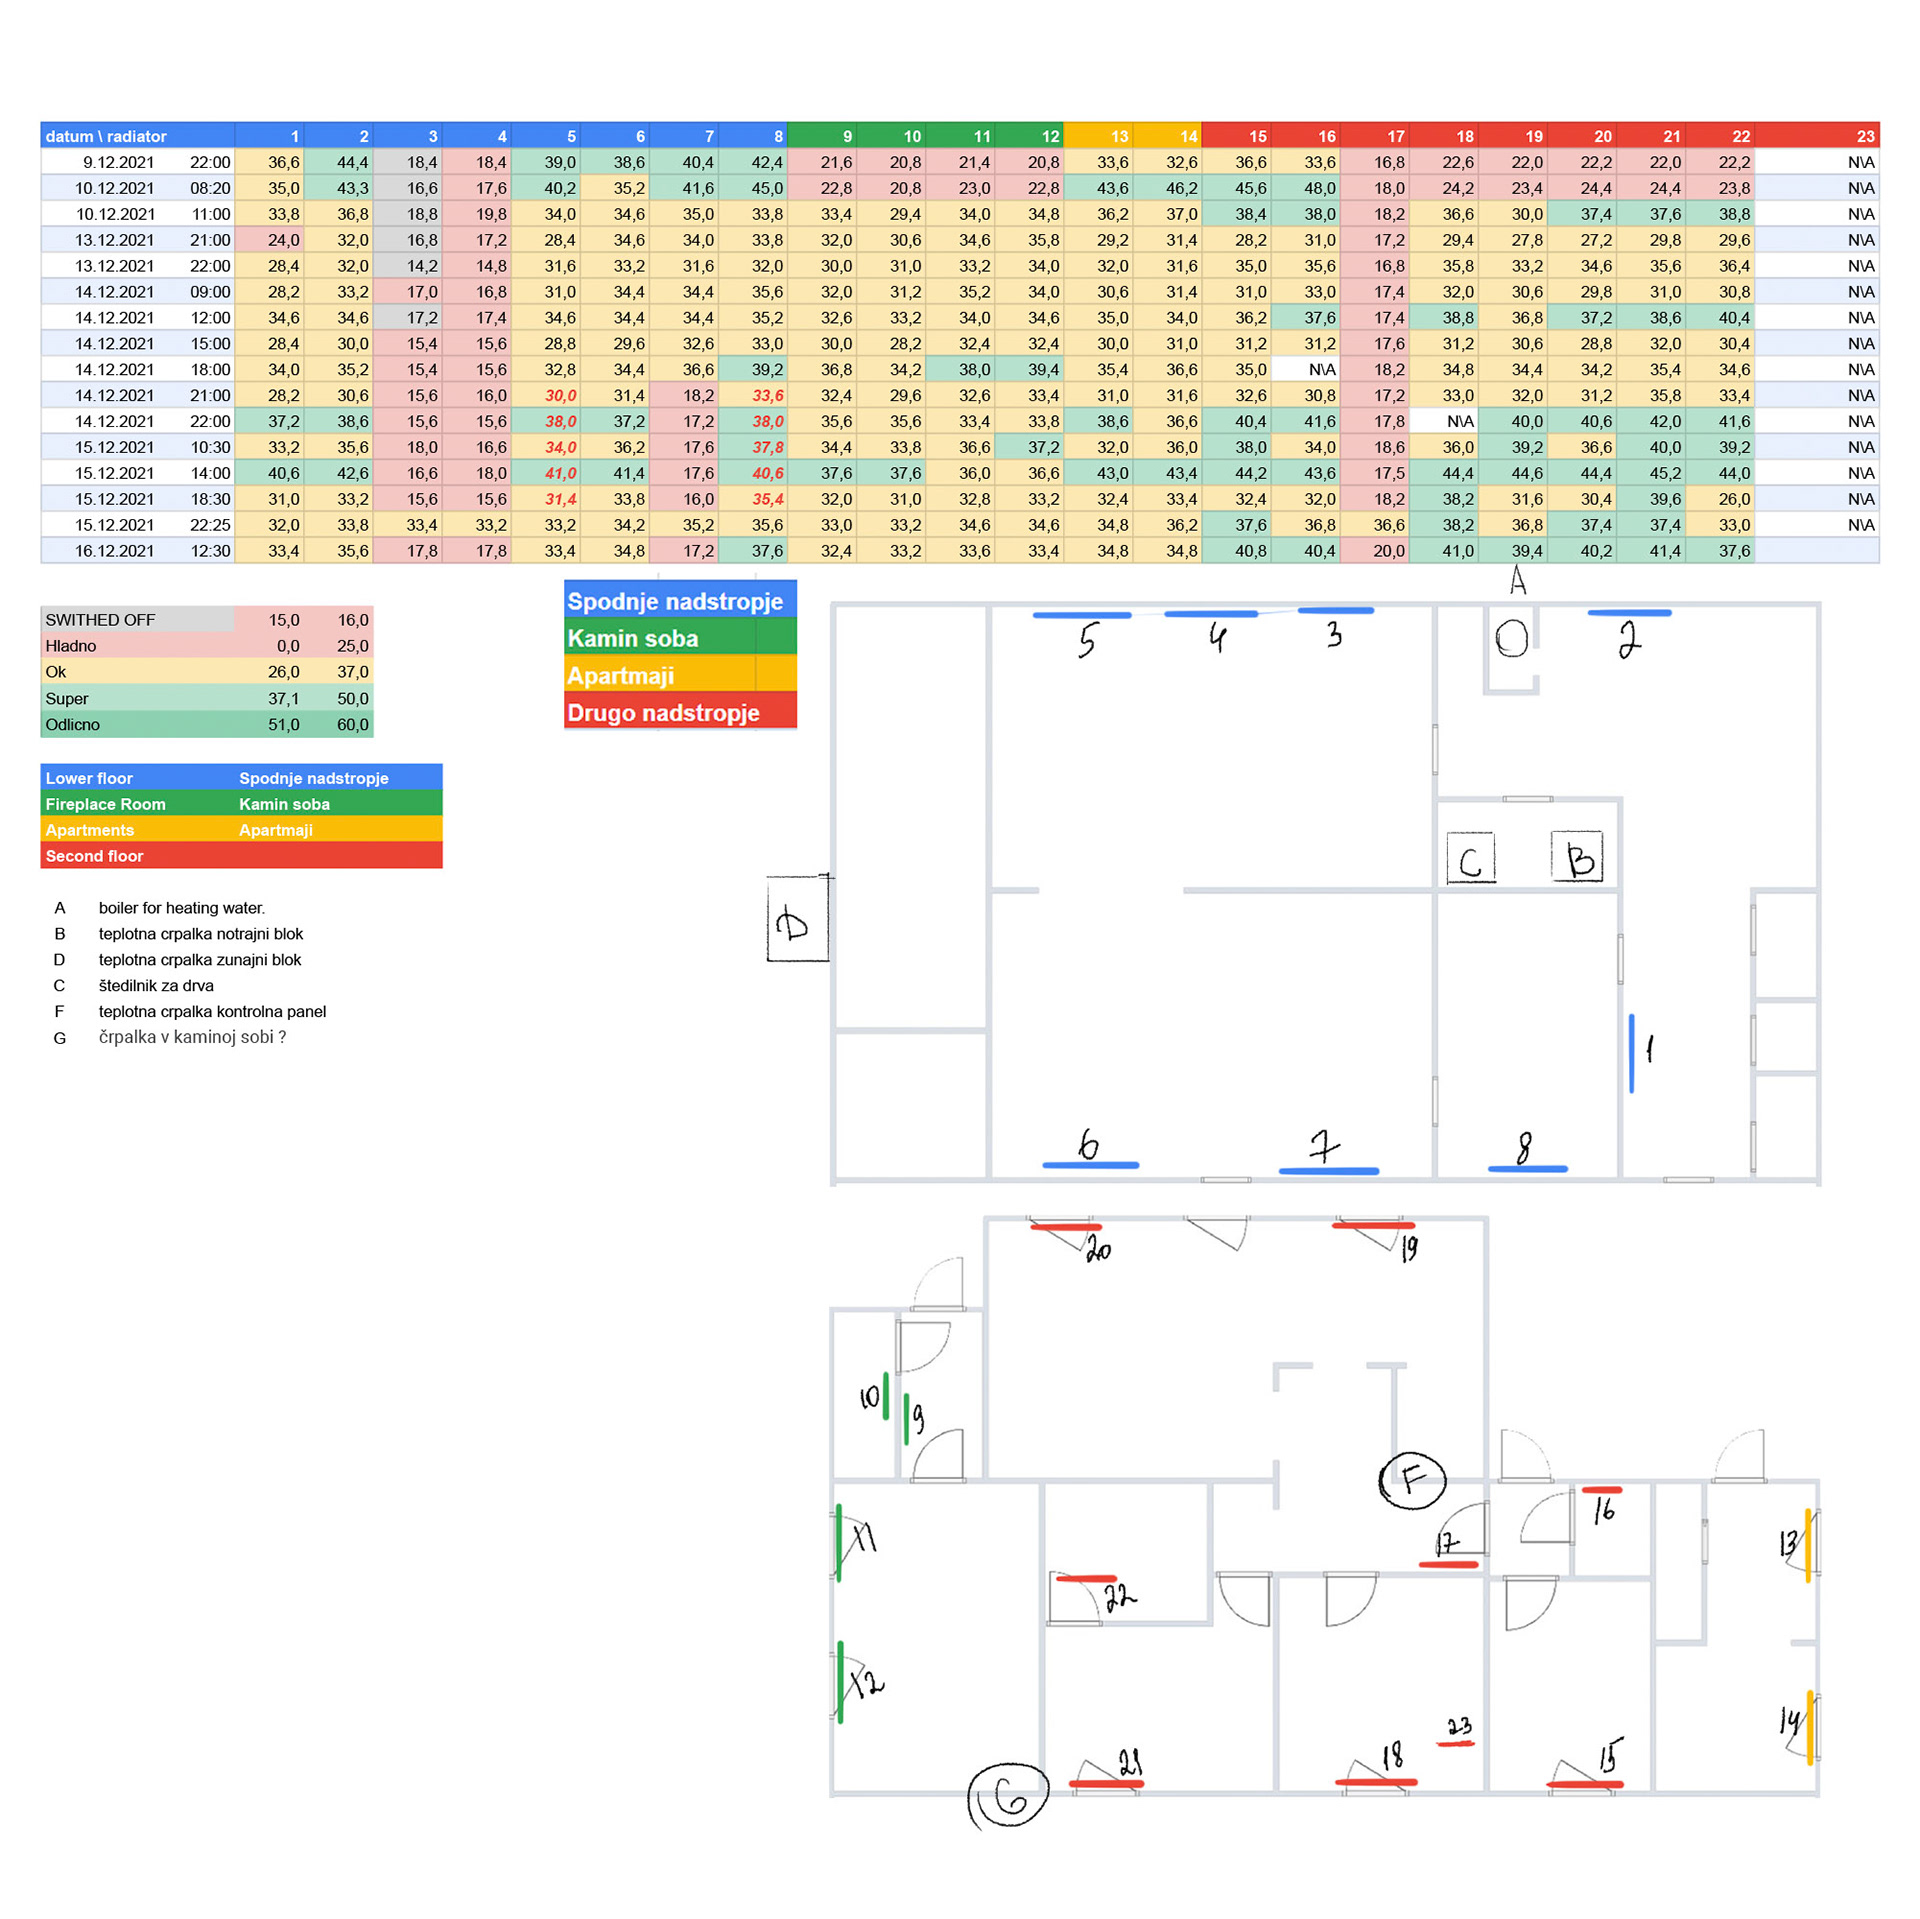
At the same time, the house was experiencing constant issues with the Hitachi YUTAKI S80 heat pump (error 070 - No pressure or water flow - in our case clogged filter). Radiators were cold, and hot water was unreliable.
During the winter, radiator temperatures were measured manually and tracked over time to understand how the system behaved. The approach was systematic but required constant attention and did not give much results. This was the starting point for understanding the heating system.
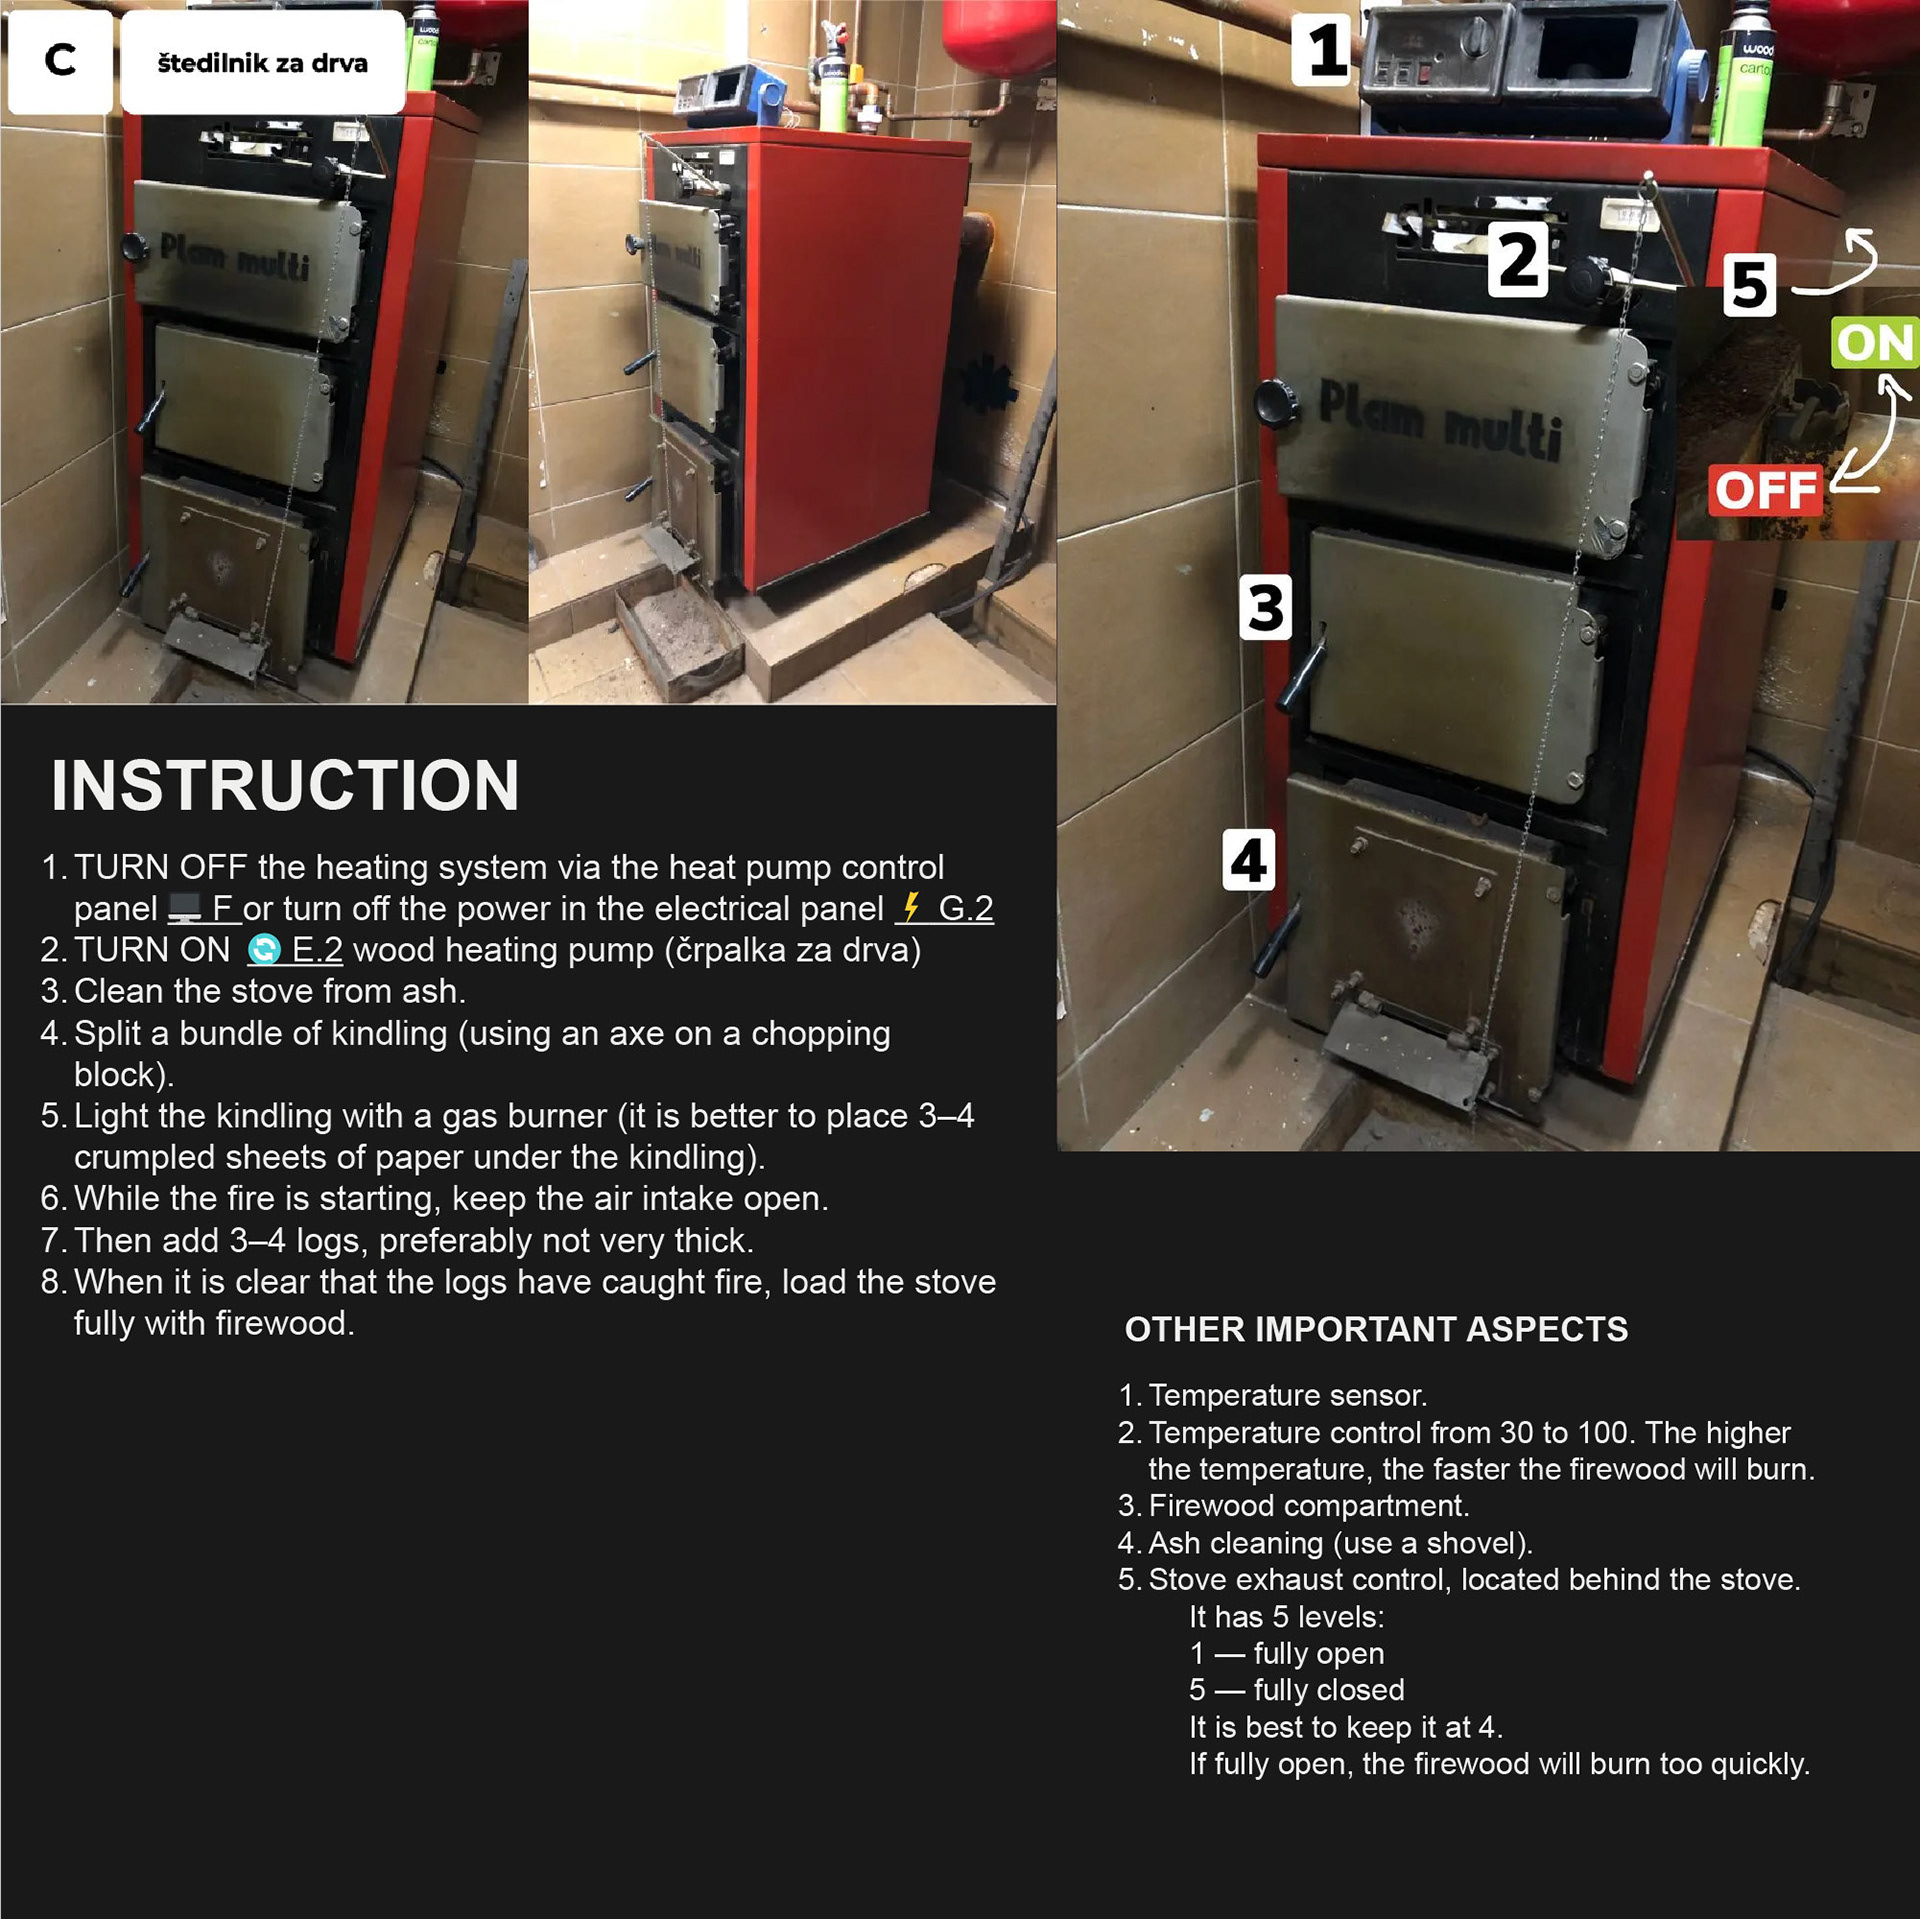
Because heating was unreliable, a wood stove had to be used regularly.
Clear step-by-step instructions were created to operate it safely and avoid pressure issues in the system, and prevent smoke space. QR codes with instructions were added around the house.
Clear step-by-step instructions were created to operate it safely and avoid pressure issues in the system, and prevent smoke space. QR codes with instructions were added around the house.
This stage focused on gathering scattered knowledge, fixing obvious problems, and making the house understandable and usable for everyone.
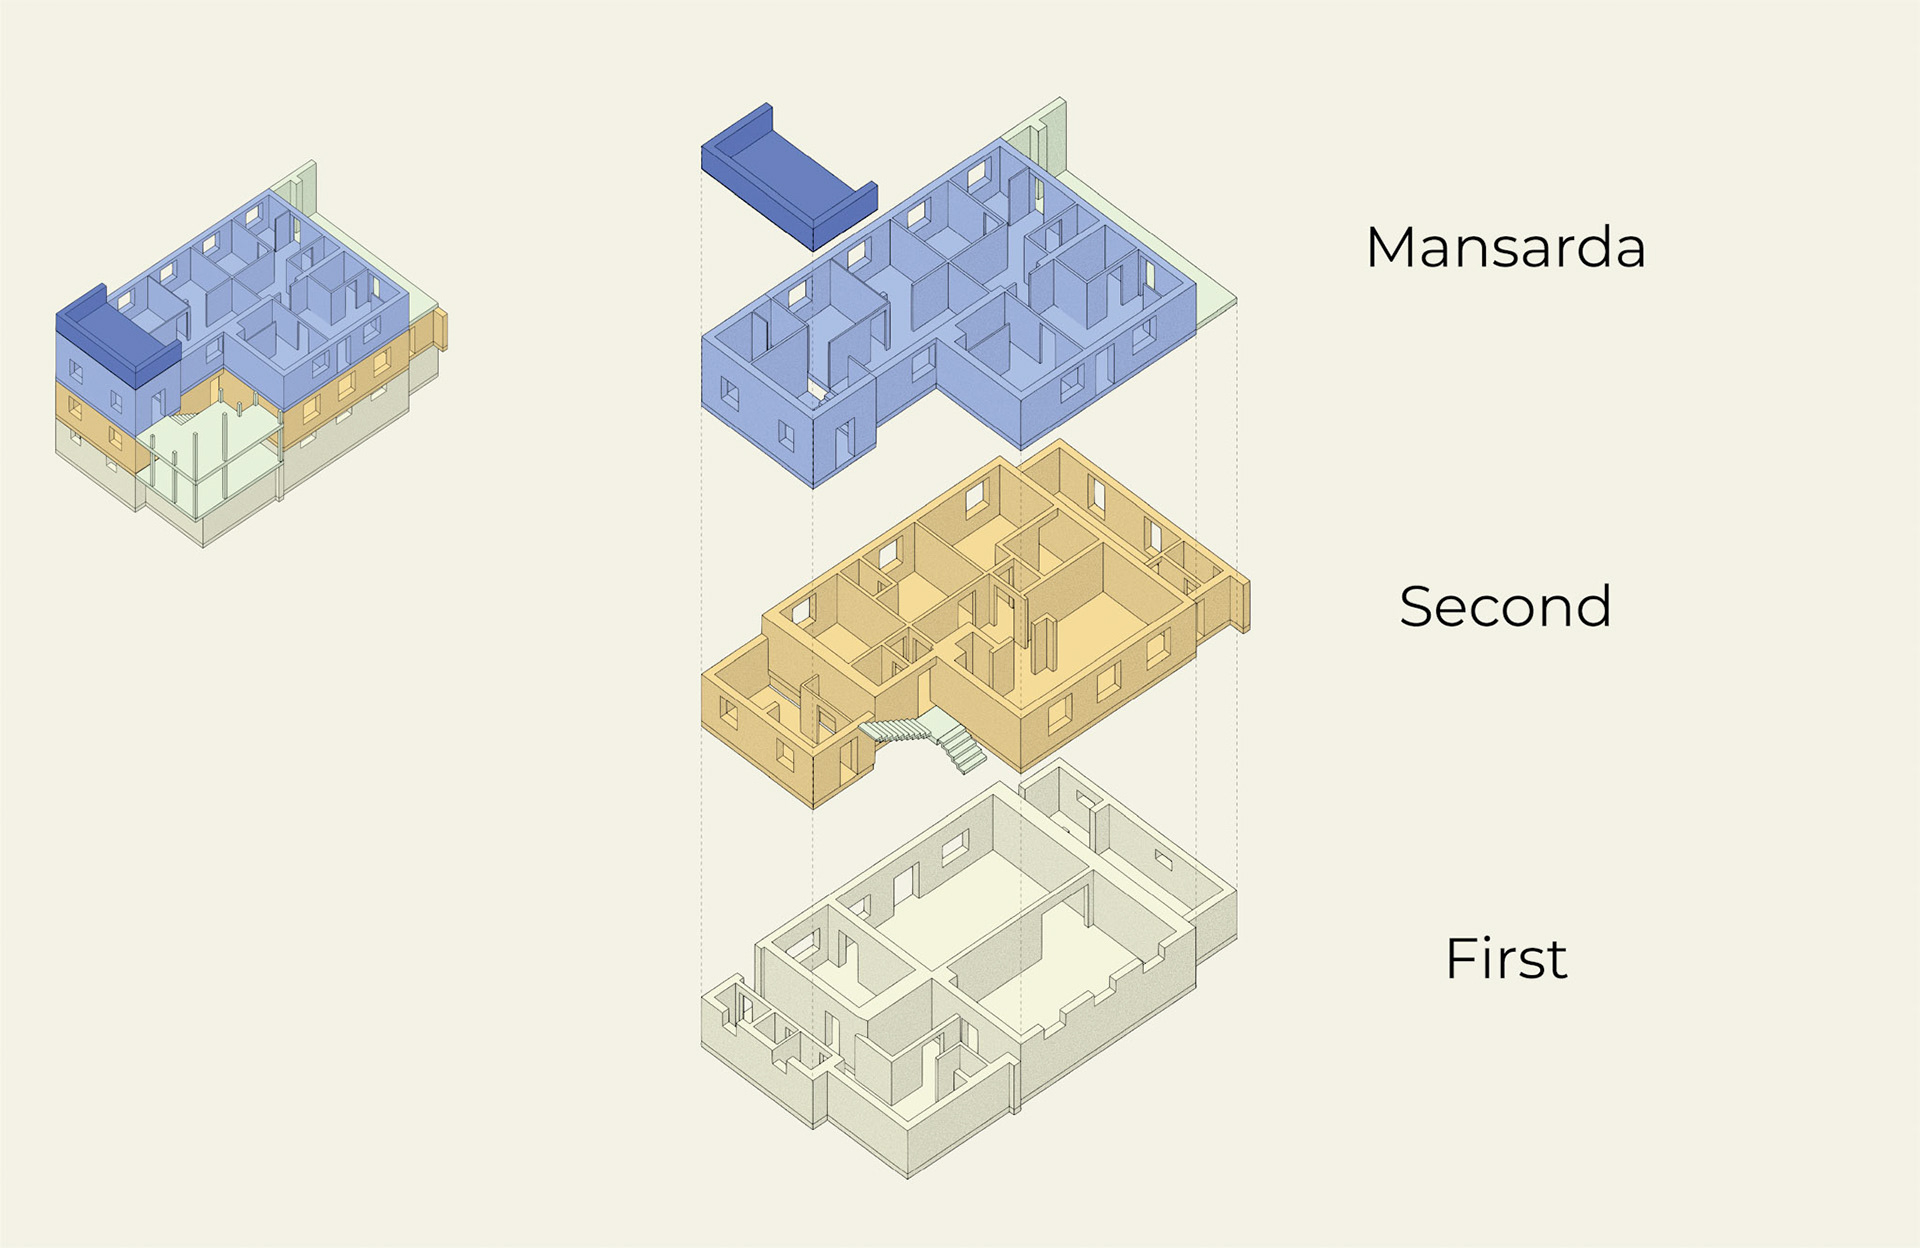
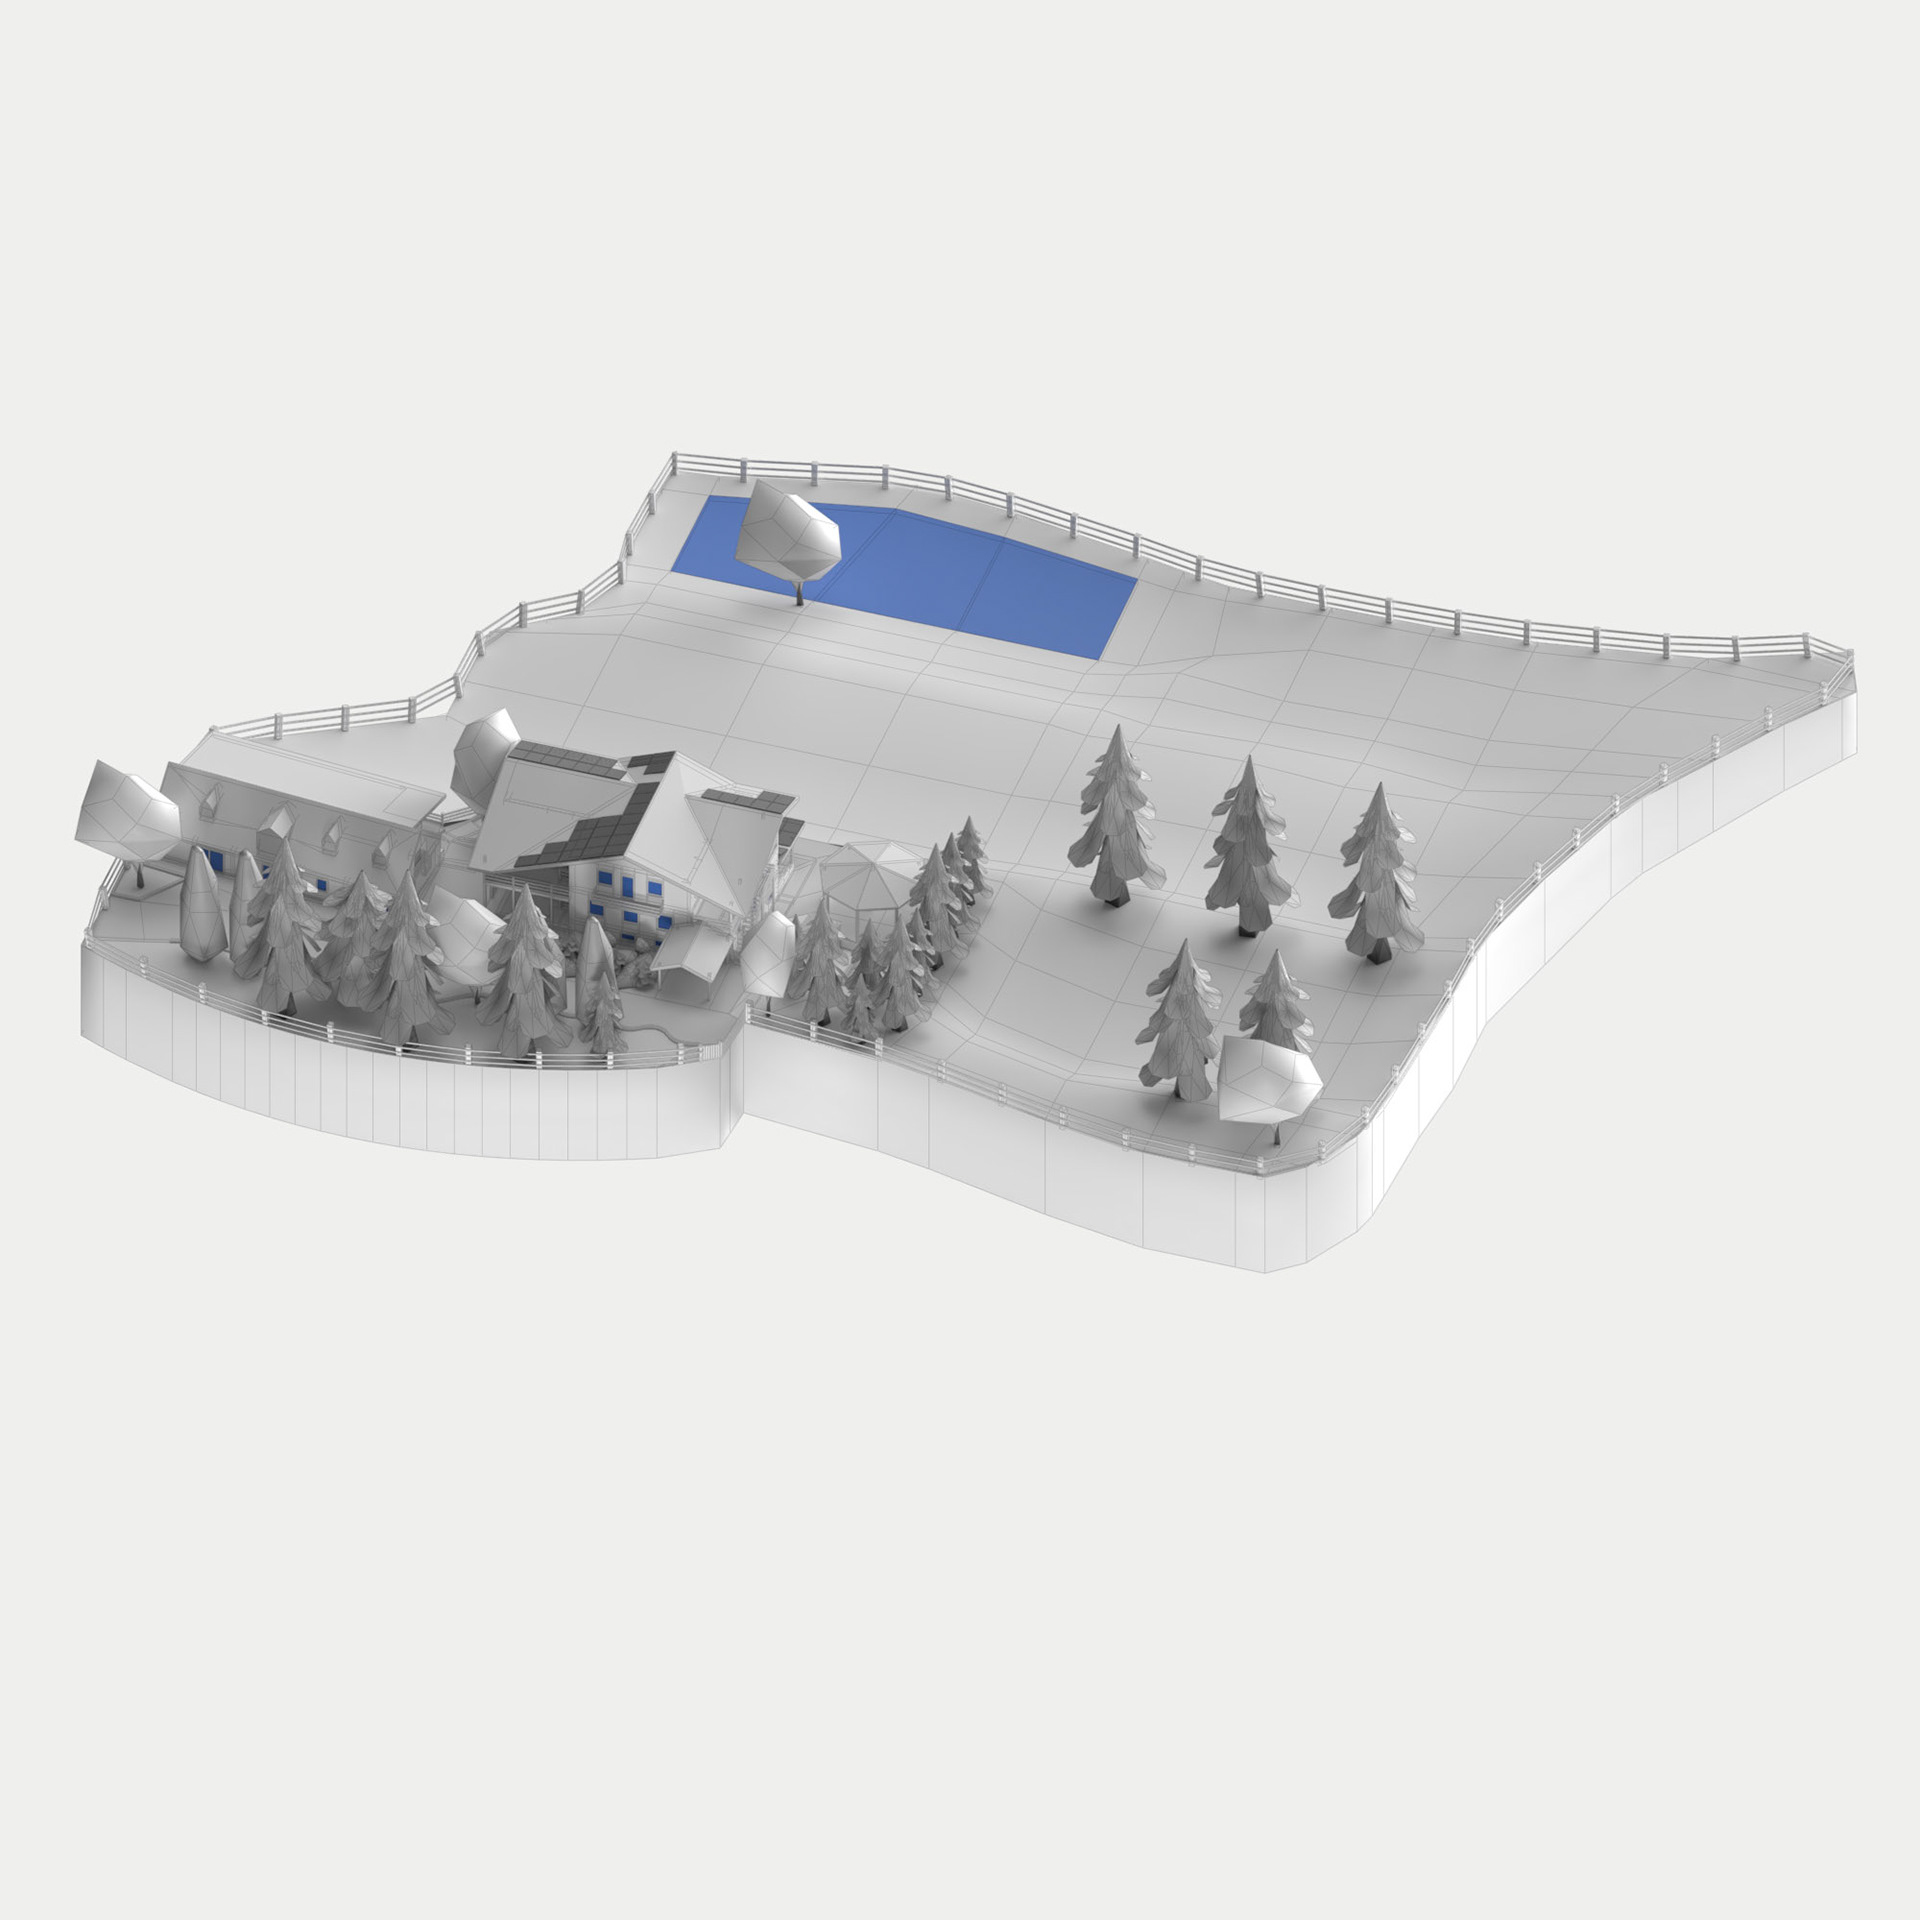
Stage 2 — Building a full-scale 3D model
The move to 3D was driven by the need to see the house as a whole and understand how everything connects.
During this period, an additional DHW boiler was installed, and a solar power system was added. Excess electricity is fed back into the grid to reduce the cost of maintaining the house.
It became clear that the water supply system was quite old and would likely need to be replaced.
We did not want to build a new system without a clear plan or a clear understanding of how the existing one works. We were looking for contractors with the same structured approach.
We did not want to build a new system without a clear plan or a clear understanding of how the existing one works. We were looking for contractors with the same structured approach.

Side quest
A large cabinet turned out to be too big to move inside using standard paths.
Instead of guessing, it was tested in the 3D model, where a workable path was found.
The cabinet was moved inside successfully by following a step-by-step plan. This became an unexpected but practical use of the 3D model.
Instead of guessing, it was tested in the 3D model, where a workable path was found.
The cabinet was moved inside successfully by following a step-by-step plan. This became an unexpected but practical use of the 3D model.
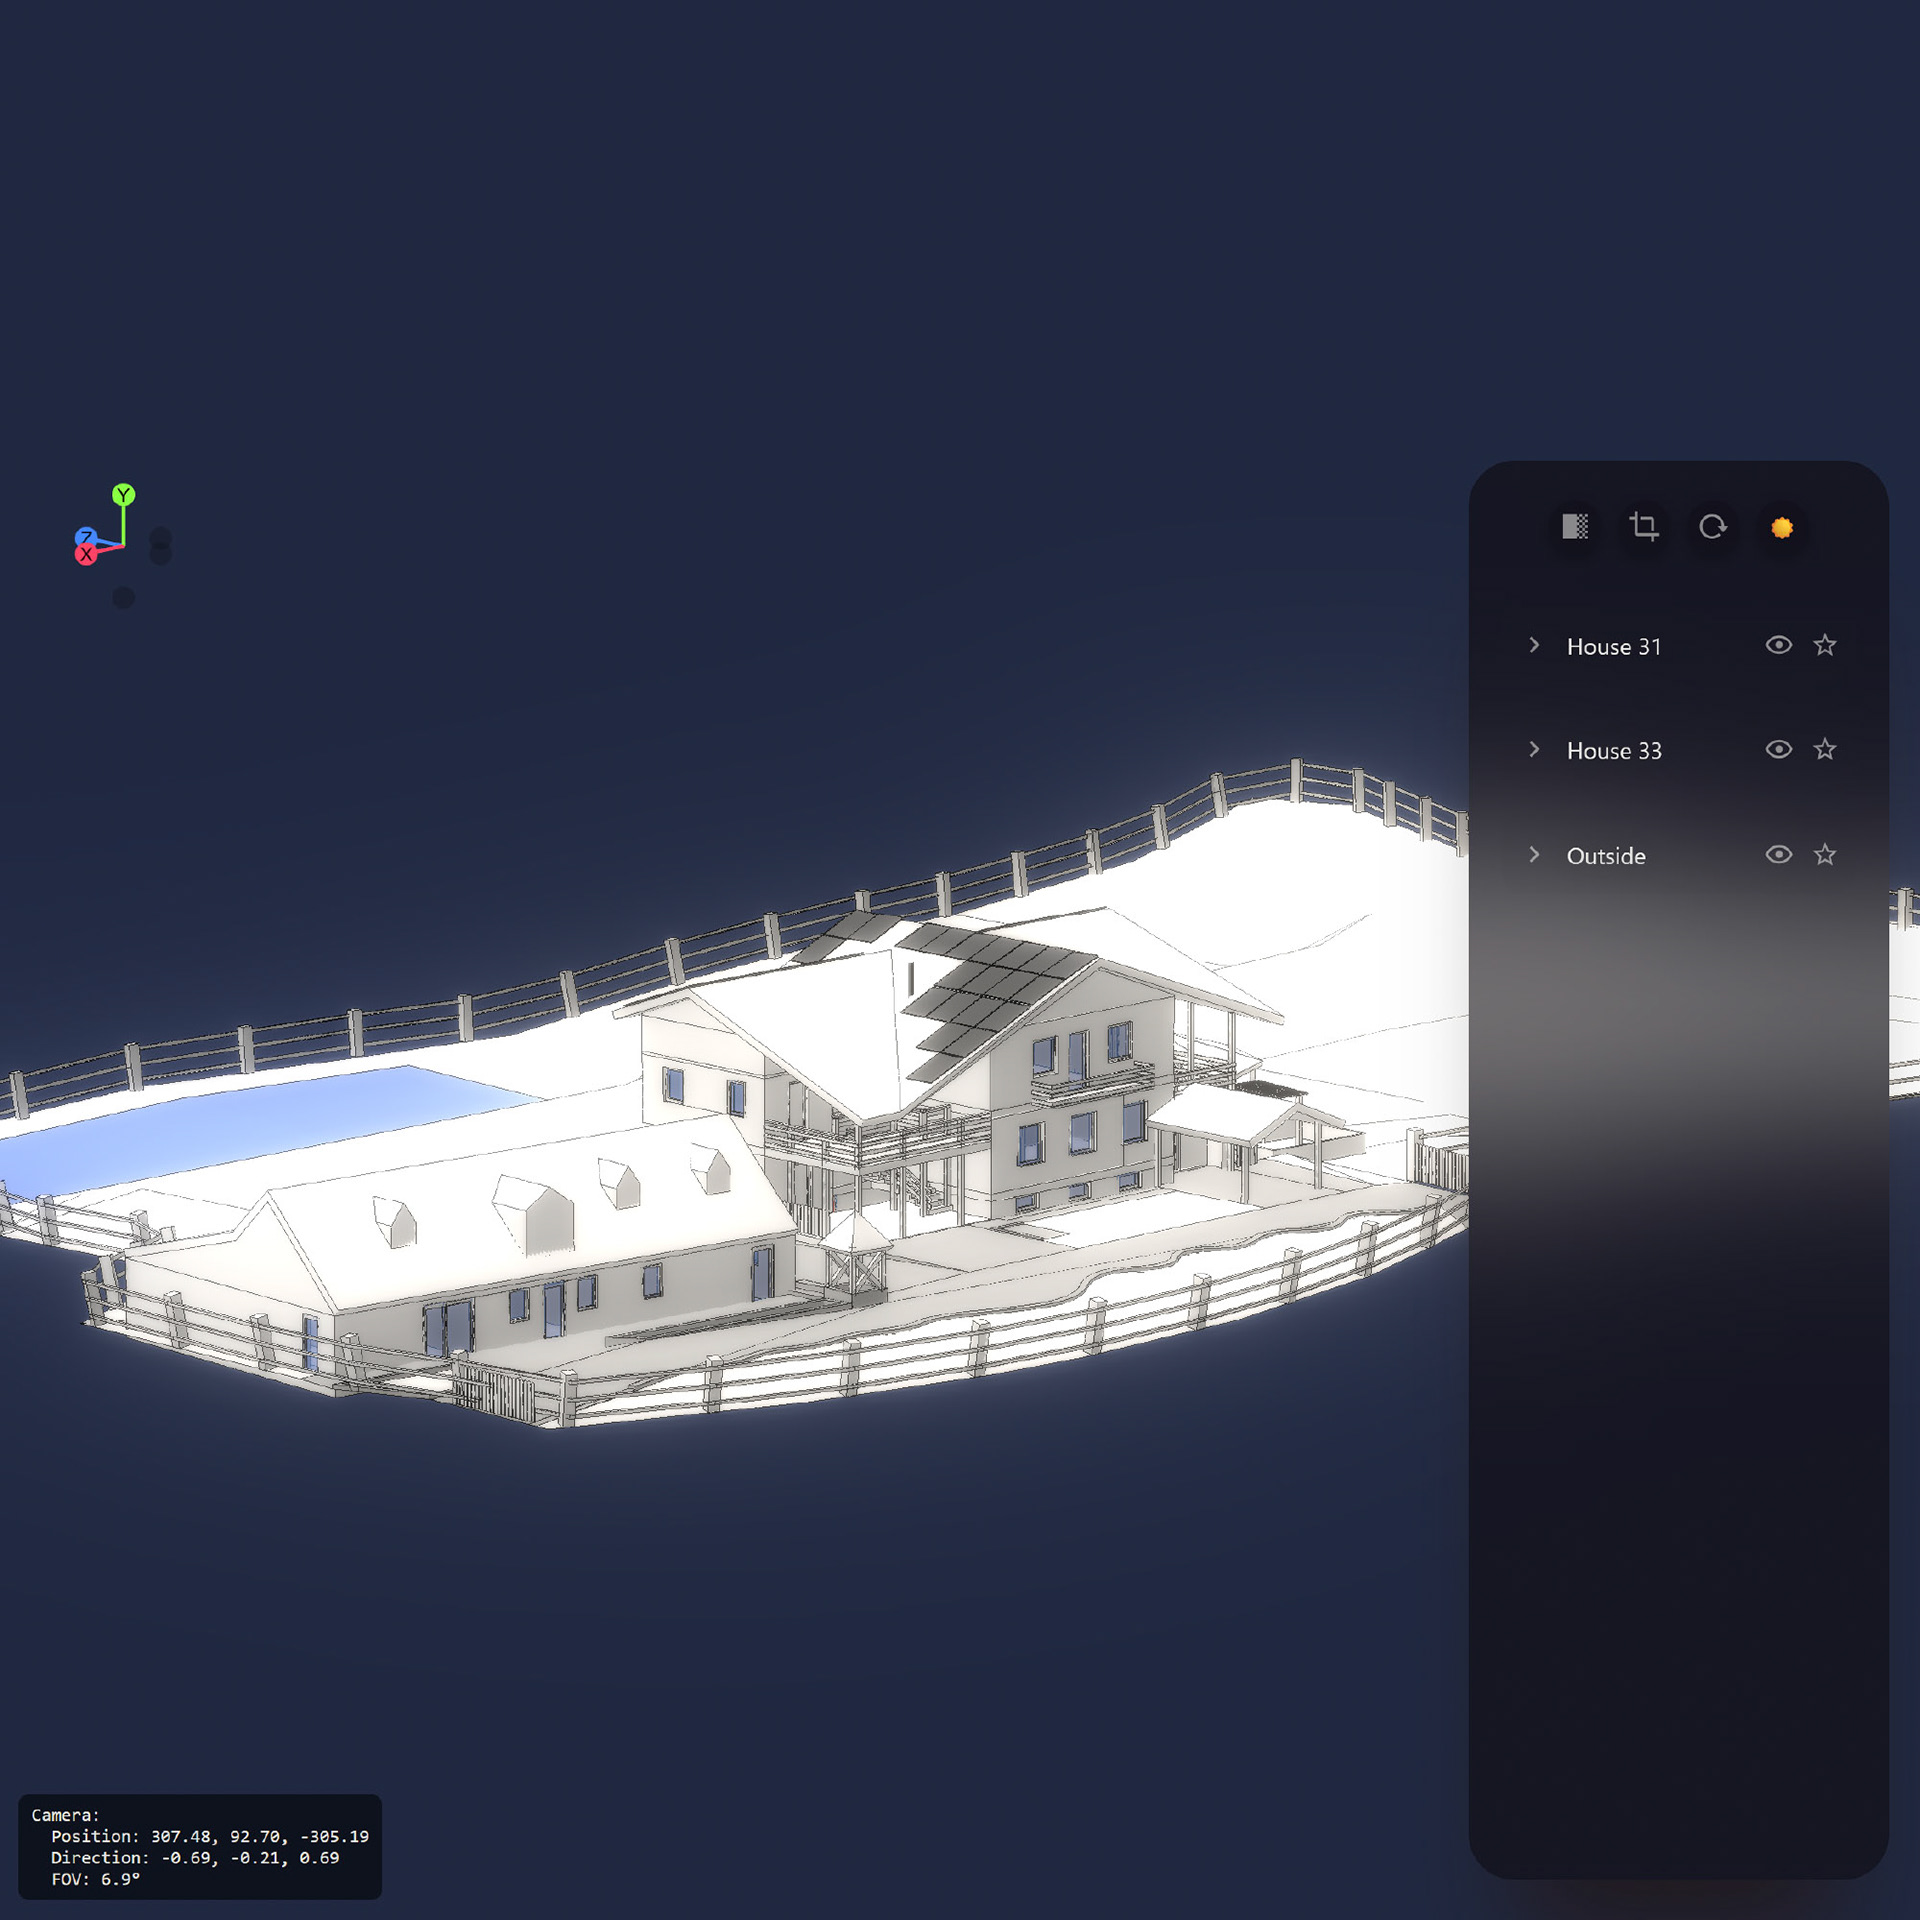
Stage 3 — Outside mapping
The model was extended beyond the house to include the outside area and a secondary building.
LiDAR scanning was used to capture real dimensions, heights, and terrain.
LiDAR scanning was used to capture real dimensions, heights, and terrain.
This made it possible to see all buildings and the surrounding area in a single, consistent model.
The house was no longer treated as an isolated object, but as part of a larger system.
The house was no longer treated as an isolated object, but as part of a larger system.
Stage 4 — Home Assistant integration
Home Assistant was installed and configured to monitor the house systems. Sensors were added to track energy consumption, temperatures, and overall system behavior.
Practical automations were added to solve everyday frustrations. Smart plugs and Telegram notifications were used to notify when the washing machine starts and finishes. This removed the need to check the laundry room.
Additional notifications were set up:
• daily alerts for low battery levels on devices
• weekly energy reports
• alerts in case of unusually high energy consumption
• This stage focused on making system information visible and useful in daily life.
• daily alerts for low battery levels on devices
• weekly energy reports
• alerts in case of unusually high energy consumption
• This stage focused on making system information visible and useful in daily life.
Stage 5 — Making sense of the water system
At this stage, the water system became the main focus. A water leak was discovered, and it turned out that hot water was leaking into the ground. Hot and cold water behavior was inconsistent, and the overall system logic was unclear. A thermal camera was used to investigate the system and proved effective for locating hot water pipes in walls, ceilings, and floors.
Different DHW recirculation modes were tested. One of the hot water recirculation pipes was suspected to be connected to the cold water line, so it was isolated and shut off.
Based on thermal imaging and testing, a clear water system layout was created and added to the overall house model. The water system now behaves predictably and works reliably.
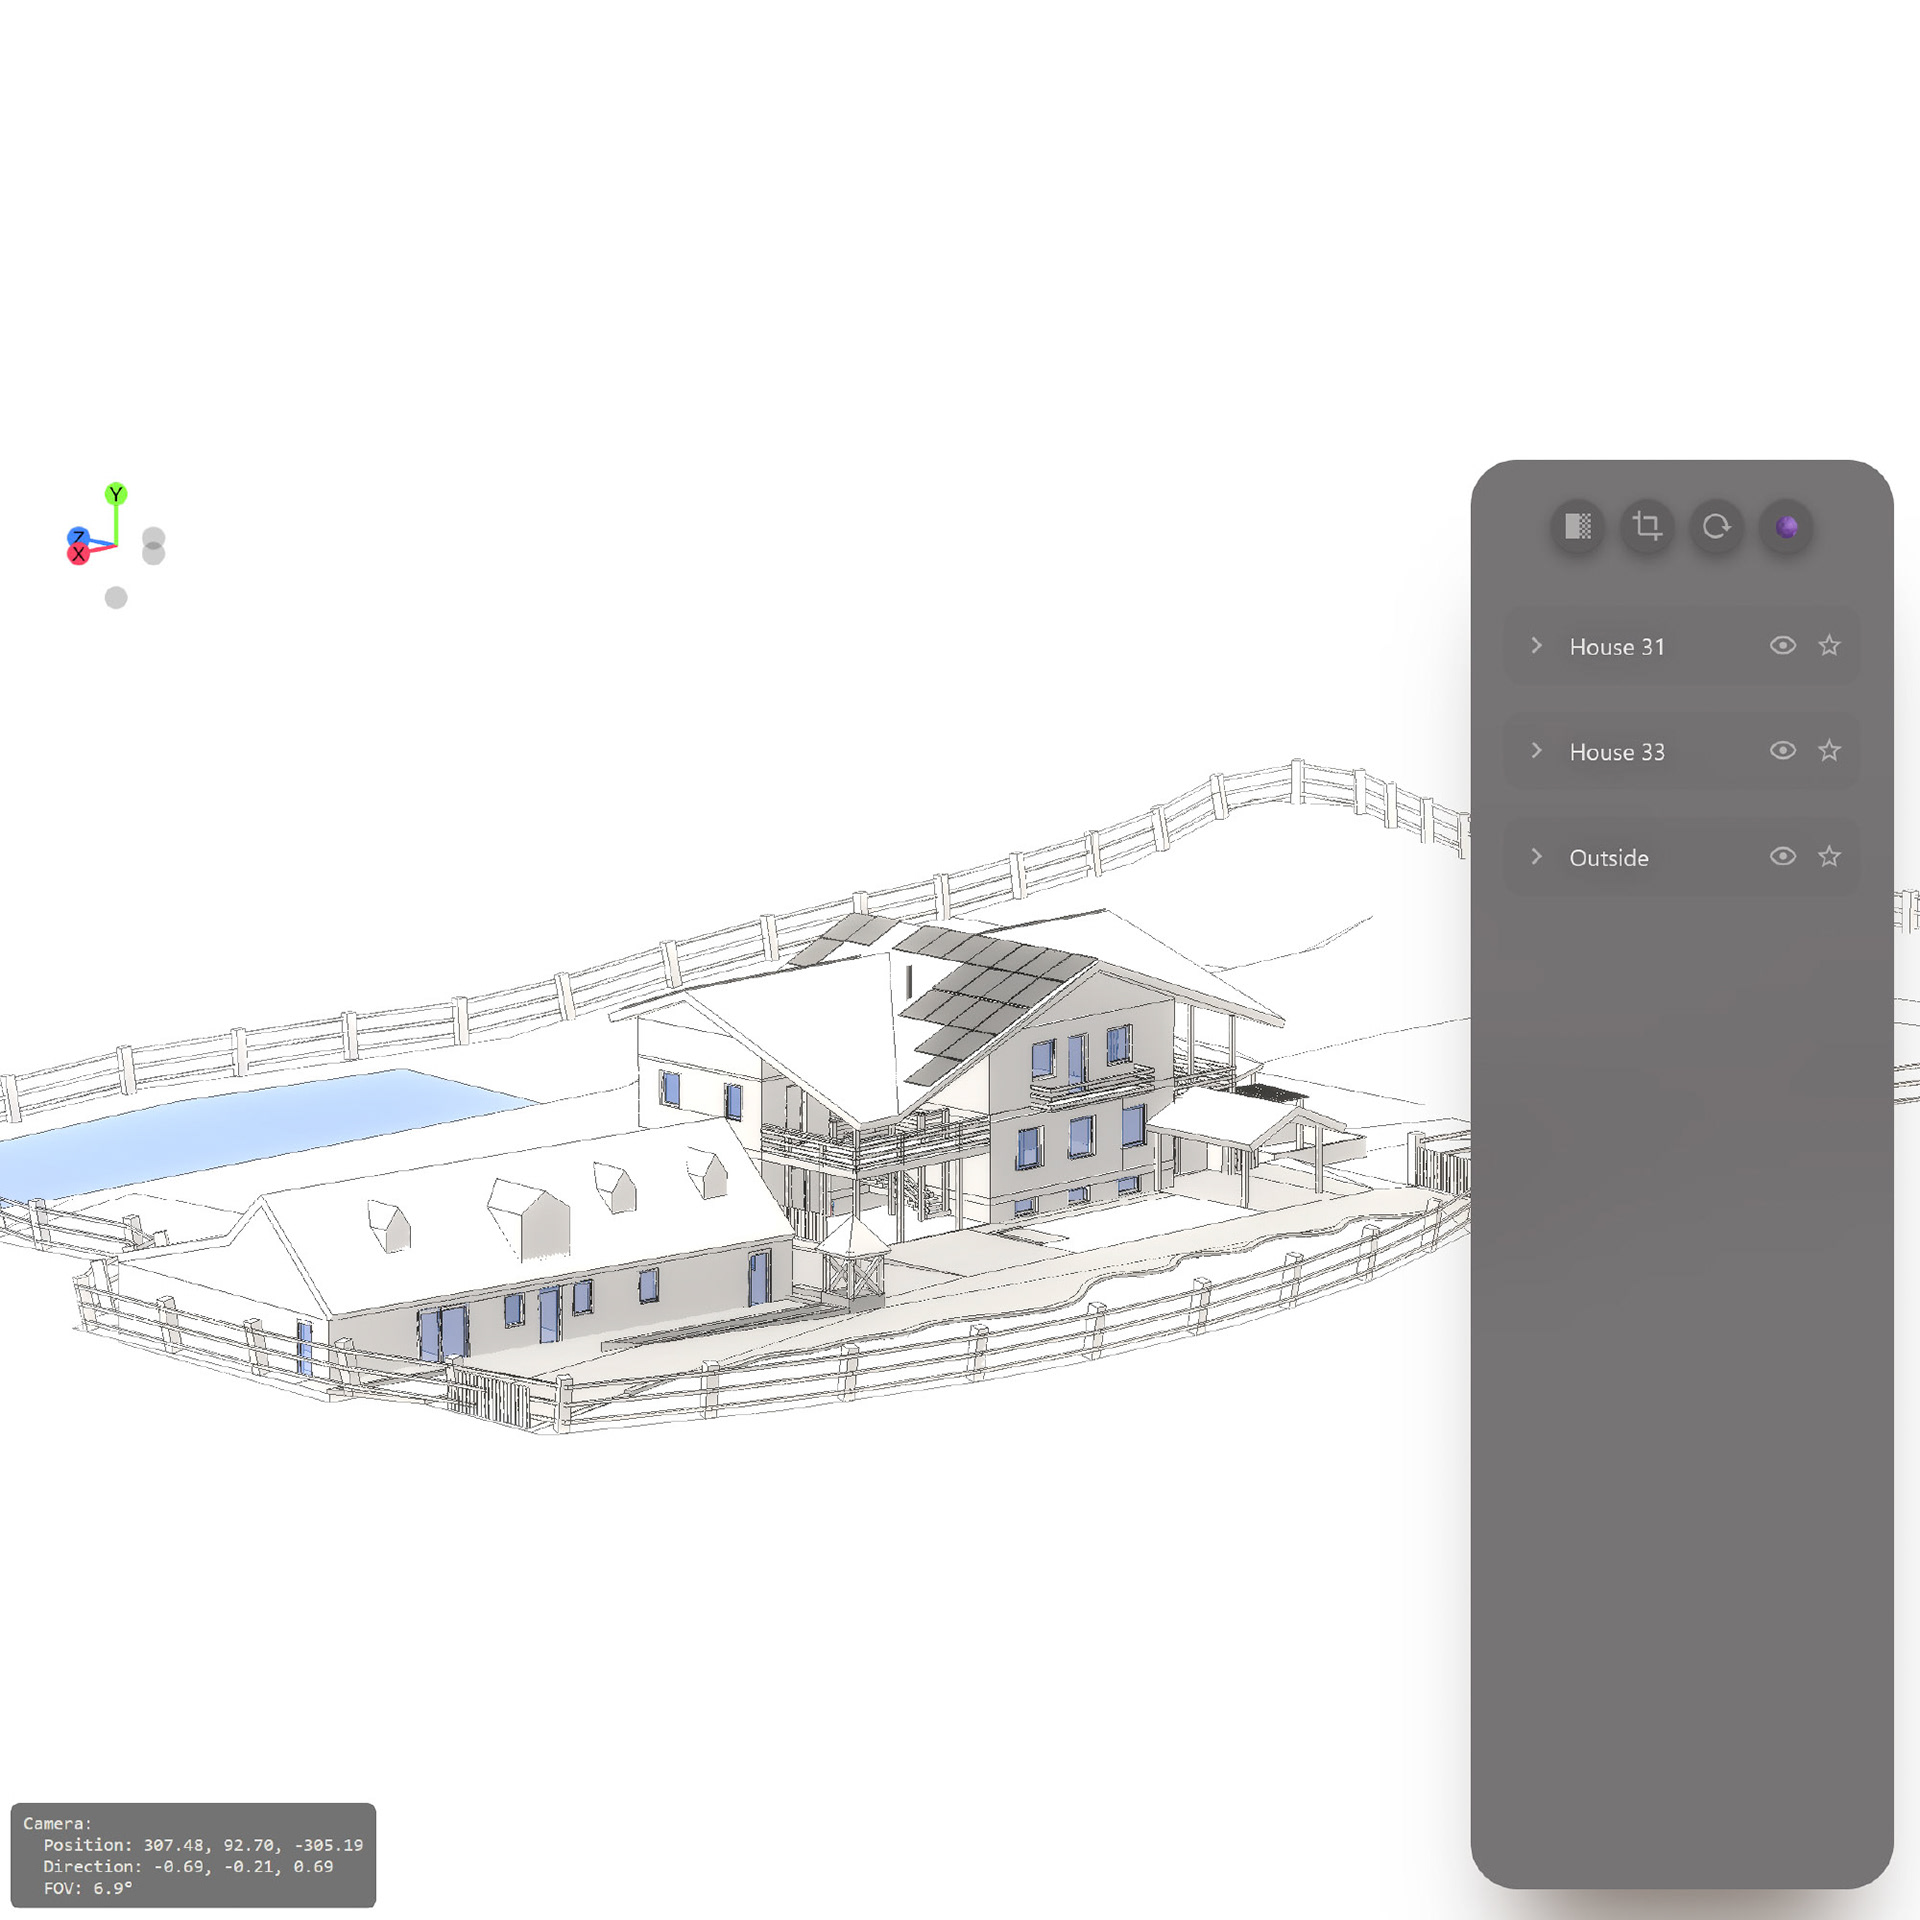
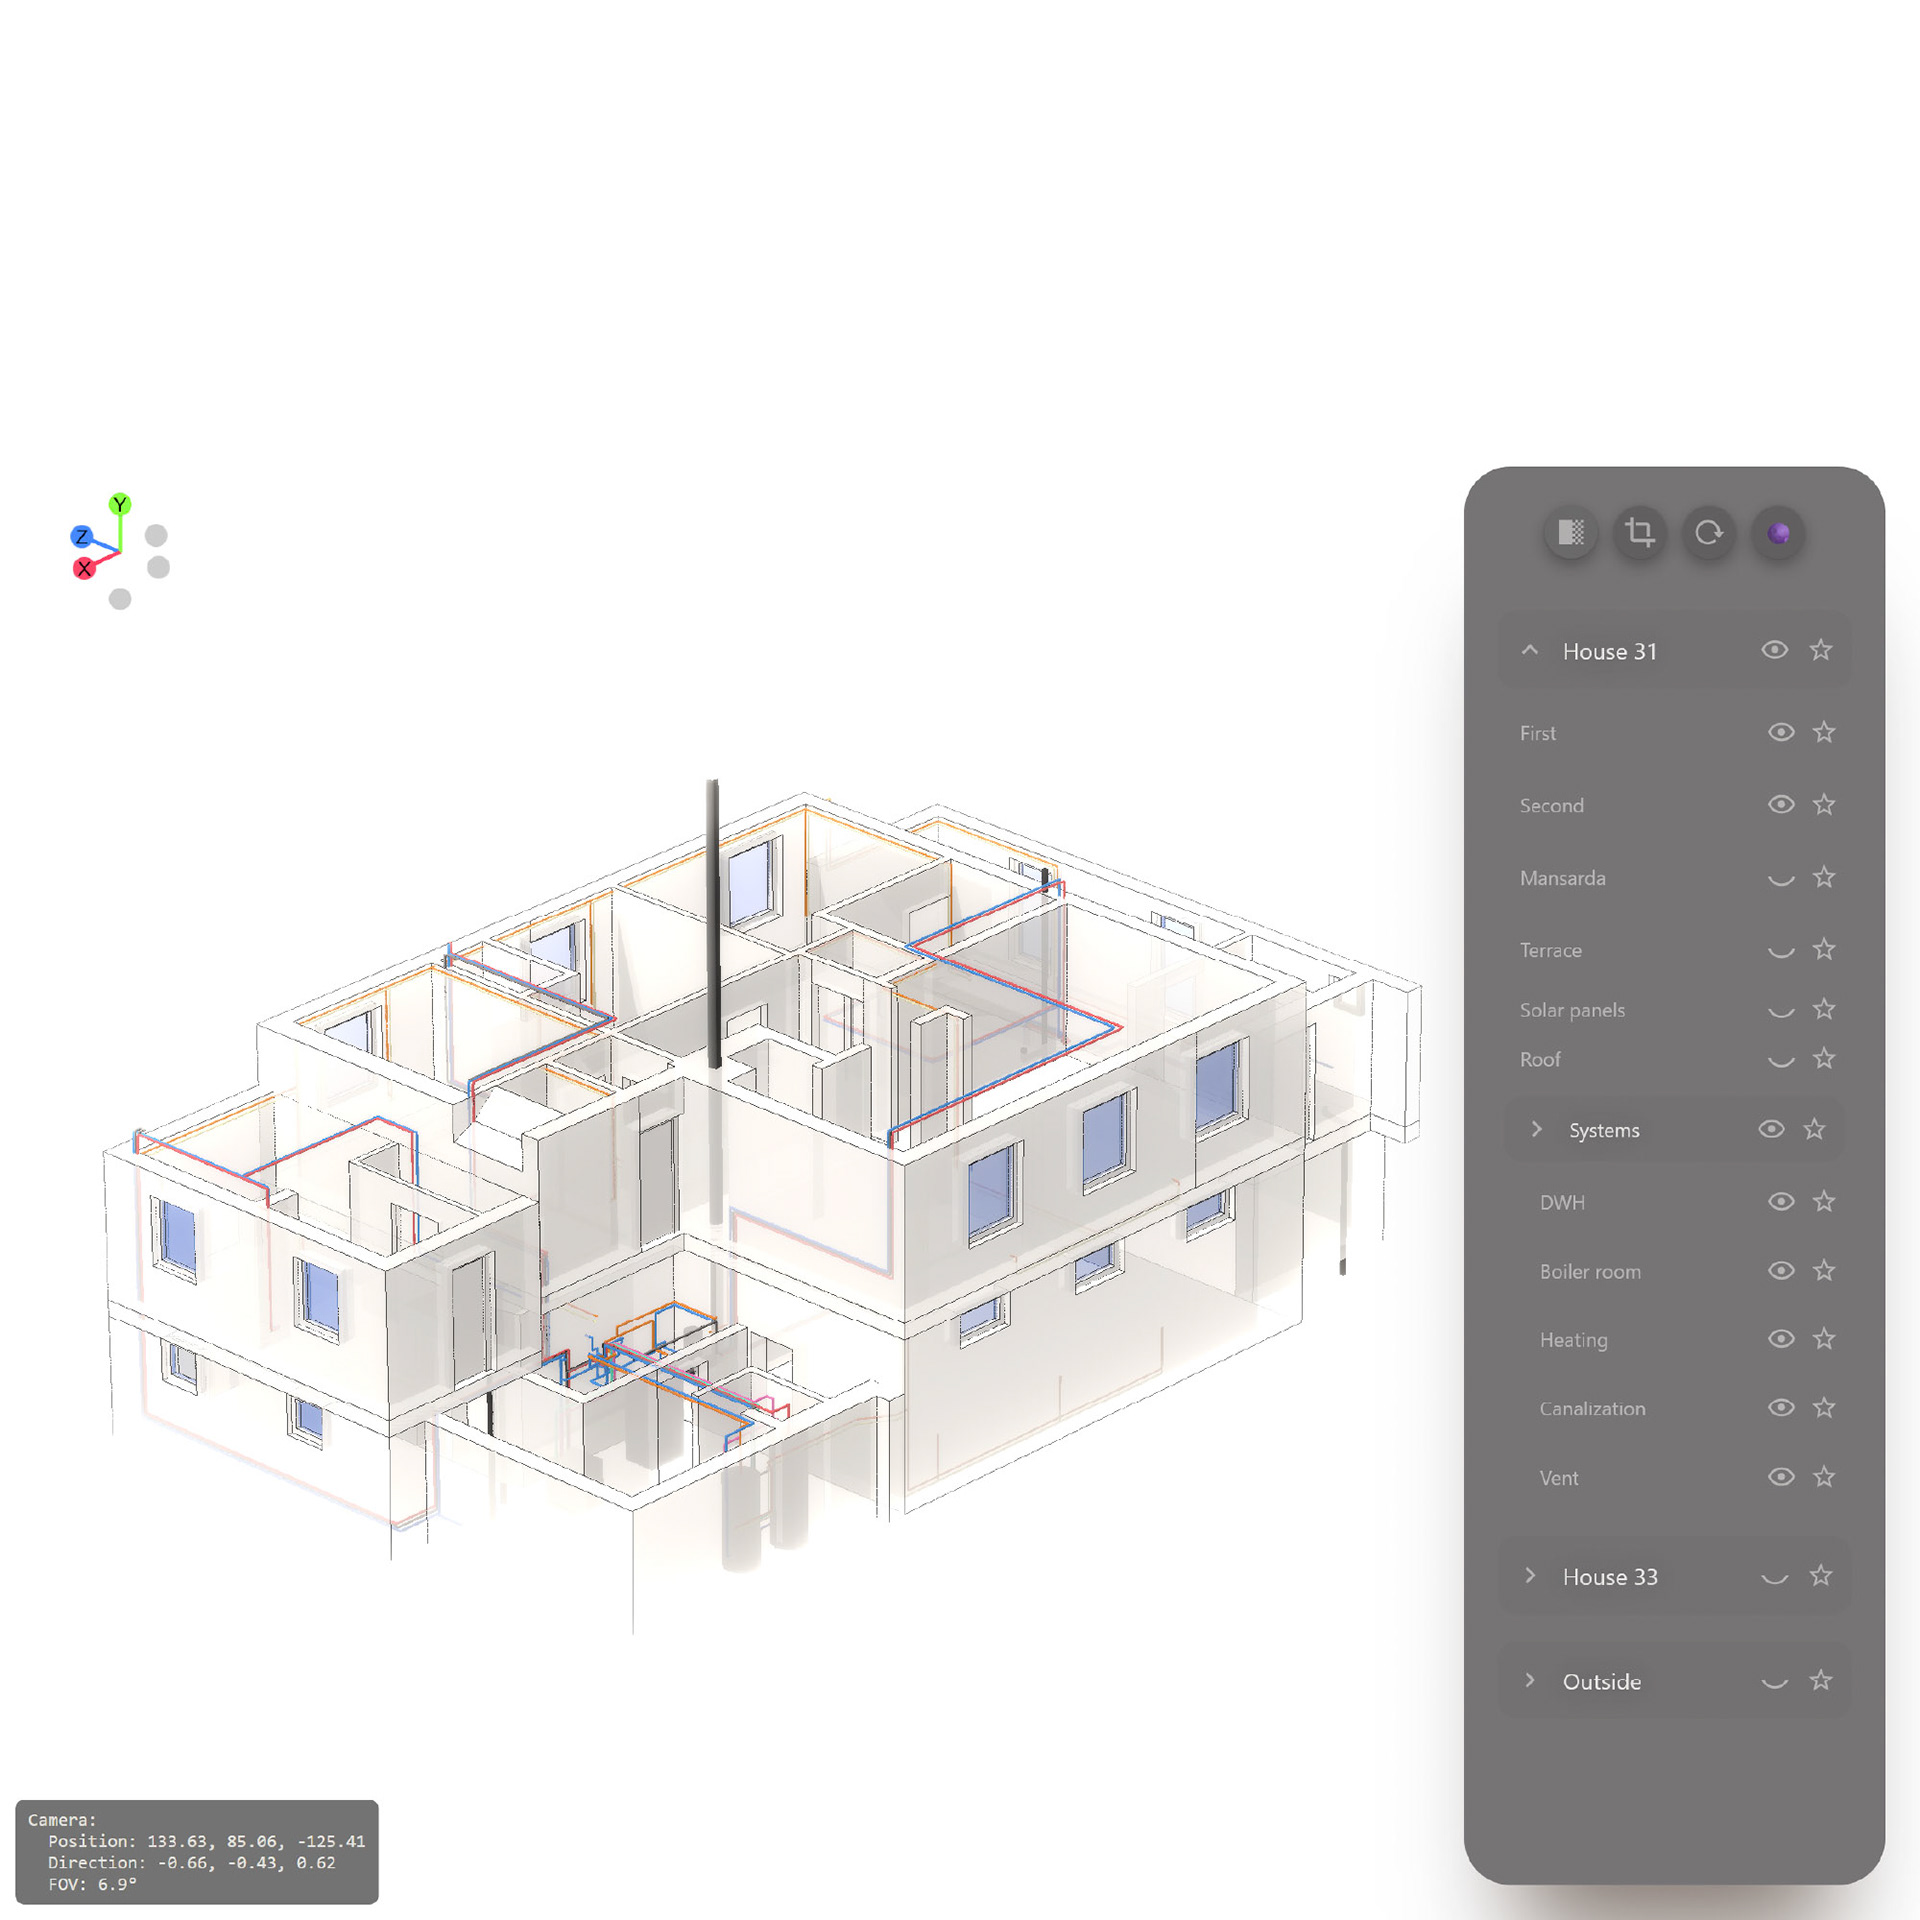
Stage 6 — One place for the whole system
The updated 3D model, including water pipes and system layers, was integrated into Home Assistant. Basic navigation was added to make the model usable in practice. Floors and system layers can be shown or hidden, allowing focused views when needed. This made the full house system accessible at any time and from any device, without relying on one person’s knowledge or a single computer.
At this point, the 3D model became an interface for understanding the house, not just a model.
Future plans
The next step is integrating Modbus to access data from the Hitachi inside Home Assistant. The goal is not full automation, but a better understanding: how the system actually behaves, compare modes, and choose the most appropriate operating settings rather than guessing.
To be continued...